松本典子の「Azure Logic Apps」超入門 ~AI編~ 第5回
「Azure Logic Apps」で「Bing Maps」のコネクタを利用する
現在地から目的地までの道案内をするLINEチャットボットを作ろう
2019年09月13日 10時00分更新

4-1. Azure Logic Appsを新規作成する
Azureの管理ポータル の左メニュー項目「+リソースの作成」→「Web」をクリックすると、項目にAzure Logic Appsが表示されます。 Logic Apps の新規作成方法は「以前の記事」を参考にしてください。
4-2. ワークフローを作成する
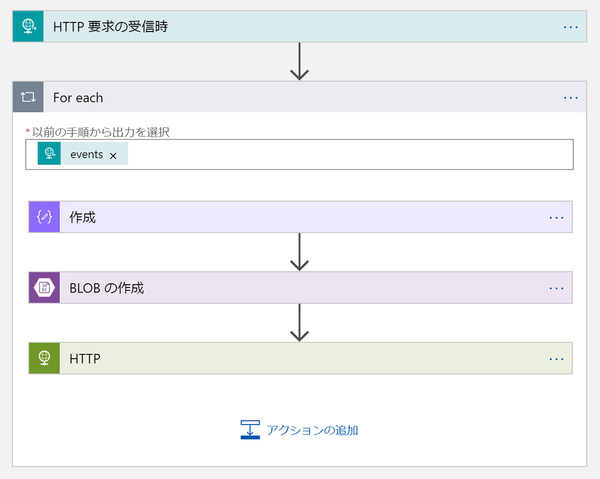
ワークフローの全体図
ワークフローの全体図はこのような形です。 今回は、「目的地までの経路を描画した地図を表示するHTMLファイル」をLogic Appsの「データ操作」コネクタで自動生成し、Blob ストレージに格納、URLをLINEで返信するという仕組みです。
4-2-1. Azure Logic Appsのトリガーの作成
Azure Logic Appsのトリガーには「HTTP 要求の受信時」を選択します。トリガーの設定内容とLINE側の設定については「ノンコーディングで質問に自動回答するLINE BOTを作ってみよう」に詳細を記載していますので参考にしてください。
4-2-2. 「データ操作」コネクタの設定

データ操作コネクタ
検索窓に「データ操作」と入力し、「作成」をクリックします。 Logic Apps のデータ操作コネクタでは、直接コードを記入することができます。「入力」の枠内に以下のコードを全てコピペします。
<!DOCTYPE html>
<html lang="ja">
<head>
<meta charset="UTF-8">
<title>目的地案内:小倉城までの道順</title>
<style>
html,body,#main{height:100%;}body{padding:0;margin:0;background:#333;}#main{border: 1px solid #666;display:inline-block;width:100%;}h1{padding:0;font-size:90%;margin:10px;color:white;}
#directionsItinerary{width:100%;padding:30px;background:white;font-size:100%;}p{margin:0}</style>
</head>
<body>
<h1>目的地案内:小倉城までの道順</h1>
<!-- MAP[START] -->
<div id="main">
  <div id="myMap" style='width:90%;height: 50%;'></div>
  <div id='directionsItinerary'></div>
</div>
<!-- MAP[END] -->


<script src='https://www.bing.com/api/maps/mapcontrol?callback=GetMap&key=[ 取得したBingMap keyを入力 ]' async defer></script>
<script>
let map,directionsManager;
function GetMap() {
  map = new Microsoft.Maps.Map('#myMap', {
    center: new Microsoft.Maps.Location(33.884444, 130.874256),
    zoom: 18,
    mapTypeId: Microsoft.Maps.MapTypeId.load,
  });
  //Load the directions module.
  Microsoft.Maps.loadModule('Microsoft.Maps.Directions', function () {
    //Create an instance of the directions manager.
    directionsManager = new Microsoft.Maps.Directions.DirectionsManager(map);
    //Create waypoints to route between.
    var StartWaypoint = new Microsoft.Maps.Directions.Waypoint({ address: 'Start', location: new Microsoft.Maps.Location([現在地の緯度],[現在地の経度]) });
    directionsManager.addWaypoint(StartWaypoint);
    var EndWaypoint = new Microsoft.Maps.Directions.Waypoint({ address: 'End', location: new Microsoft.Maps.Location(33.884444, 130.874256) });
    directionsManager.addWaypoint(EndWaypoint);
    //Specify the element in which the itinerary will be rendered.
    directionsManager.setRenderOptions({itineraryContainer: '#directionsItinerary' });
    directionsManager.setRequestOptions({ routeMode: Microsoft.Maps.Directions.RouteMode.walking });
    //Calculate directions.
    directionsManager.calculateDirections();
  });
}
</script>
</body>
</html>
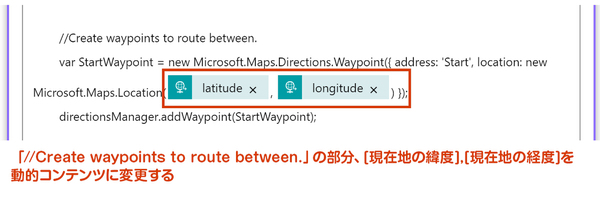
動的コンテンツに変更する
コード内で[現在地の緯度],[現在地の経度]の表記の部分を動的コンテンツに置き換えます。
また、今回は目的地を「小倉城」としていますが、別の場所に変更したい場合は上記コード内の以下の行を変更してください。緯度/経度の数値は、Bing Maps上で目的地を右クリックすると表示、コピーできます。
center: new Microsoft.Maps.Location([目的地の緯度],[目的地の経度]),
今回のコードは多様なBingMapsテンプレートが用意されているサイト「BingMap Go!」を参考に作成しました。 BingMapsに色々な要素を付け加えたいときは、サイトを参考に変更してみてください。
この連載の記事
-
第11回
TECH
AI+ノーコードで動画の字幕を自動生成するツールを作ろう -
第10回
TECH
メールで届く添付ファイルの暗号化を自動解除するLogic Appsを作ろう -
第9回
TECH
人物写真の顔をAIが検出し、ぼかしてツイートするLogic Appsを作ろう -
第8回
TECH
Power AutomateのRPA「UIフロー」でPhotoshopの操作を自動化してみよう -
第7回
TECH
「指定した場所に近づくとスマホに買い物リストを通知する」仕組みを作ろう -
第6回
TECH
文字入り画像を送るとテキストに書き起こすLINEボットを作ろう -
第4回
TECH
音声認識AIを使ってLINEのボイスメッセージをテキスト変換してみよう -
第3回
TECH
自分用メモ的にLINE送信した予定をAIで読み取ってGoogleカレンダーに自動登録しよう -
第2回
TECH
AIで「alt属性」文章を自動生成しよう!もちろんノンコーディングで -
第1回
TECH
ノンコーディングで質問に自動回答するLINE BOTを作ってみよう - この連載の一覧へ


