松本典子の「Azure Logic Apps」超入門 ~AI編~ 第4回
Microsoft Cognitive Servicesの「Speech to text」をノンコーディングで使う
音声認識AIを使ってLINEのボイスメッセージをテキスト変換してみよう
2019年04月26日 12時30分更新

4. Azure Logic Appsの作成
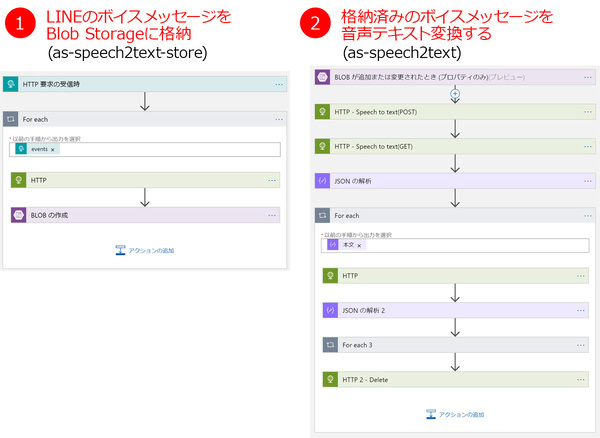
今回のLogic Appsは2つ作成します。
Logic Apps の作成
1つ目はLINEのボイスメッセージをBlob Storageに格納する「as-speech2text-store」、2つ目は格納済みのボイスメッセージをSpeech to textサービスを利用して音声テキスト変換する「as-speech2text」です。
まずは1つ目の「1:as-speech2text-store」の作成方法です。
4.1. Azure Logic Appsを新規作成する
Azureの管理ポータル の左メニュー項目「+リソースの作成」→「Web」をクリックすると、項目にAzure Logic Appsが表示されます。Logic Apps の新規作成方法は「以前の記事」を参考にされてください。
4.2. 「1:as-speech2text-store」を作成する
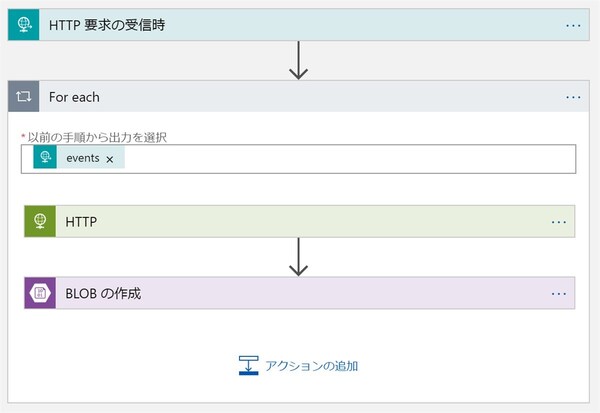
as-speech2text-storeの全体図
LINEからボイスメッセージをBlob Storageに格納する「ワークフロー1」を作成します。
4.2.1. Azure Logic Appsのトリガーの作成

トリガーの作成
Azure Logic Appsのトリガーには「HTTP要求の受信時」を選択します。「1」には以下のJSONをコピペします。このJSONはデータの入力形式を指定するものです。
{
     "properties": {
           "destination": {
                 "type": "string"
           },
           "events": {
                 "items": {
                       "properties": {
                         "message": {
                               "properties": {
                                   "duration": {
                                         "type": "integer"
                                   },
                                   "fileName": {
                                         "type": "string"
                                   },
                                   "id": {
                                       "type": "string"
                                   },
                                   "originalContentUrl": {
                                         "type": "string"
                                   },
                                   "type": {
                                         "type": "string"
                                   }
                              },
                              "type": "object"
                          },
                          "replyToken": {
                              "type": "string"
                          },
                          "source": {
                              "properties": {
                                  "type": {
                                        "type": "string"
                                  },
                                  "userId": {
                                        "type": "string"
                                  }
                              },
                             "type": "object"
                          },
                          "timestamp": {
                                "type": "integer"
                          },
                          "type": {
                             "type": "string"
                          }
                      },
                      "required": [
                          "replyToken",
                          "type",
                          "timestamp",
                          "source"
                      ],
                      "type": "object"
                },
                "type": "array"
           }
     },
     "type": "object"
}
コピペ後、「保存」をクリックし保存します。保存が完了すると、「2」部分にURLが表示されるのでコピーし、LINE側の設定に使用します。
4.2.2. HTTPコネクタの設定
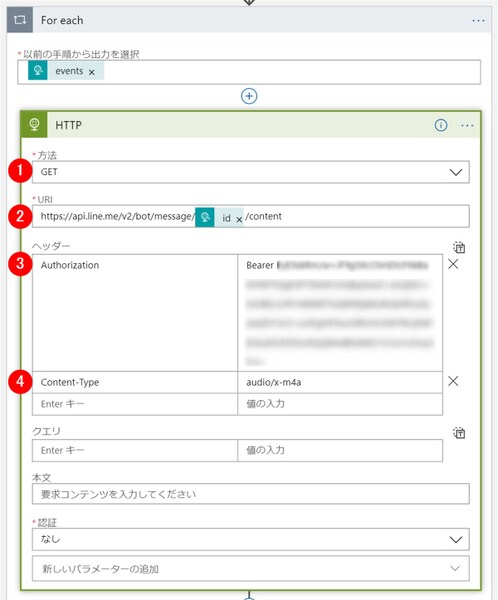
HTTPコネクタの設定
検索窓で「HTTP」と検索し、HTTPコネクタを選択します。
- 方法:「GET」を選択します。
- URI:以下の内容をコピペします。下記URIの表記のうち「動的コンテンツidを選択する」の文字を削除し、動的コンテンツの「id」に置き換えてください。
- Authorization:以前の記事 に設定方法があるので参照してください。
- Content-Type:「audio/x-m4a」を入力します。
https://api.line.me/v2/bot/message/[動的コンテンツidを選択する]/content
For eachコネクタは、「URI」の部分に動的なコンテンツ「id」を入力すると自動で設定されます。
本記事はアフィリエイトプログラムによる収益を得ている場合があります
この連載の記事
-
第11回
TECH
AI+ノーコードで動画の字幕を自動生成するツールを作ろう -
第10回
TECH
メールで届く添付ファイルの暗号化を自動解除するLogic Appsを作ろう -
第9回
TECH
人物写真の顔をAIが検出し、ぼかしてツイートするLogic Appsを作ろう -
第8回
TECH
Power AutomateのRPA「UIフロー」でPhotoshopの操作を自動化してみよう -
第7回
TECH
「指定した場所に近づくとスマホに買い物リストを通知する」仕組みを作ろう -
第6回
TECH
文字入り画像を送るとテキストに書き起こすLINEボットを作ろう -
第5回
TECH
現在地から目的地までの道案内をするLINEチャットボットを作ろう -
第3回
TECH
自分用メモ的にLINE送信した予定をAIで読み取ってGoogleカレンダーに自動登録しよう -
第2回
TECH
AIで「alt属性」文章を自動生成しよう!もちろんノンコーディングで -
第1回
TECH
ノンコーディングで質問に自動回答するLINE BOTを作ってみよう - この連載の一覧へ