静的なサイトを生成するツール「Jekyll」は、軽量ですがマニアックなツールだとWebデザイン界隈で認識されています。しかし、その印象はJekyllの一部でしかありません。できることが多く、技術者ではないユーザーやクライアントが簡単なサイトを作れる強力なツールです。
クライアントやチームメンバーが簡単に変更できて、どんなプロジェクトにも転用できる、HTMLウィジェットを作成しながらJekyllを解説します。Rubyプラグインは不要です。Shopify製のオープンソースのテンプレート言語Liquidと、昔ながらのHTMLで作成します。
変数の設定
静的サイトを動的にカスタムするための変数を設定します。いくつかの方法がありますが、インライン変数とFront matterの2つを紹介します。
インライン変数
ブログ記事をはじめ、複数回ウィジェットを使うことが想定される場合は、HTML内にインライン変数を設けます。ここではPayPalボタンを作ります。
_includesフォルダーに新規ファイル「paypal-widget.html」を作成します。以下のコードを書きます。
<form action="https://www.paypal.com/cgi-bin/webscr" method="post" target="_top">
  <input name="cmd" type="hidden" value="_s-xclick">
  <input name="hosted_button_id" type="hidden" value="VALUE">
  <button class="buy-button" name="submit">Buy Now</button>
  <img src="https://www.paypalobjects.com/en_US/i/scr/pixel.gif" alt="" width="1" height="1" border="0" style="display: none !important;">
</form>
PayPalを利用して支払う「Buy Now(今すぐ買う)」ボタンを作成しました。静的なコードなので状況に応じて書き換えられない問題があります。
動的(書き換え可能)にする要素は2つです。hosted_button_idのvalue(ボタンのidの値)と、buttonのラベル(ボタン名)です。インライン変数なら簡単に実現できます。
<form action="https://www.paypal.com/cgi-bin/webscr" method="post" target="_top">
  <input name="cmd" type="hidden" value="_s-xclick">
  <input name="hosted_button_id" type="hidden" value="{{ include.id }}">
  <button class="buy-button" name="submit">{{ include.button }}</button>
  <img src="https://www.paypalobjects.com/en_US/i/scr/pixel.gif" alt="" width="1" height="1" border="0" style="display: none !important;">
</form>変数include.idとinclude.buttonを加えました。Markdownで記述した記事でHTMLウィジェットを読み込むのは以下の通りです(使うときに値を指定する)。
{% include paypal-widget.html id="EXAMPLE-ID" button="Buy Now | $30" %}「Buy Now | $30(30ドルで買う)」ボタンができました。読み込むとき別々のinclude.idとinclude.buttonの値を設定すれば同じページでウィジェットファイルを使い回せます。
Front Matter変数
長い文字列や、ブログ記事で1回しか使わないウィジェットは、Webページやブログ記事のFront matterを利用して変数の値をセットします。ここではニュースレターの新規登録欄を作成しながら解説します。
Jekyllプロジェクトの_includesフォルダー内に新規ファイル「signup-widget.html」を作り、以下のコードを書きます。
<div class="signup-cta">

  <h2>Sign up to the newsletter</h2>
  <p>Receive daily updates straight to your inbox—just fill out your name and email address and hit Submit!</p>

  <form method="POST">
    <input id="name" placeholder="First name">
    <input type="email" placeholder="Email address">
    <button type="submit">Submit</button>
  </form>

</div>動的に書き換え可能にしたい要素は、h2(見出し)の文字列、p要素以下の文字列、buttonの文字列です。
<div class="signup-cta">

  <h2>{{ page.cta.title }}</h2>
  <p>{{ page.cta.body }}</p>

  <form method="POST">
    <input id="name" placeholder="First name">
    <input type="email" placeholder="Email address">
    <button type="submit">{{ page.cta.button }}</button>
  </form>

</div>マークダウンで記述したブログ記事やWebページで読み込む際に、YamlでFront matterの変数を定義します。
---
cta:
    title: "Get the newsletter"
    body: "Like this blog post? Sign up to receive more content like this, delivered straight to your inbox every day."
    button: "Sign me up!"
---
前と同じで、好きなところからウィジェットを読み込めます。
{% include signup-widget.html %}CSSも加えて完成です。
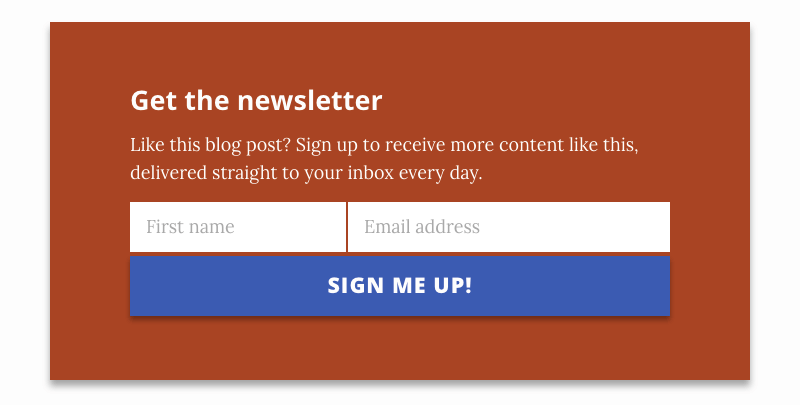
ブログ記事で複数回使うことも可能ですが、同じところから変数の値を取ってくるため、まったく同じものになります。1つのWebページやブログ記事で内容が異なるウィジェットを使いたいなら、インライン変数が最良の方法です。
最後に
Jekyllプロジェクトで強力なウィジェットを作る、簡単な方法を2つ紹介しました。このワザの可能性は計り知れません。
(原文:Quick Tip: How to Build Customizable HTML Widgets in Jekyll)
[翻訳:西尾健史/編集:Livit]


