WordPressで大量の記事を公開しているときに便利なのがクイック編集。独自に追加したカスタムフィールドを表示できると、日々の運用がもっと捗りますね!
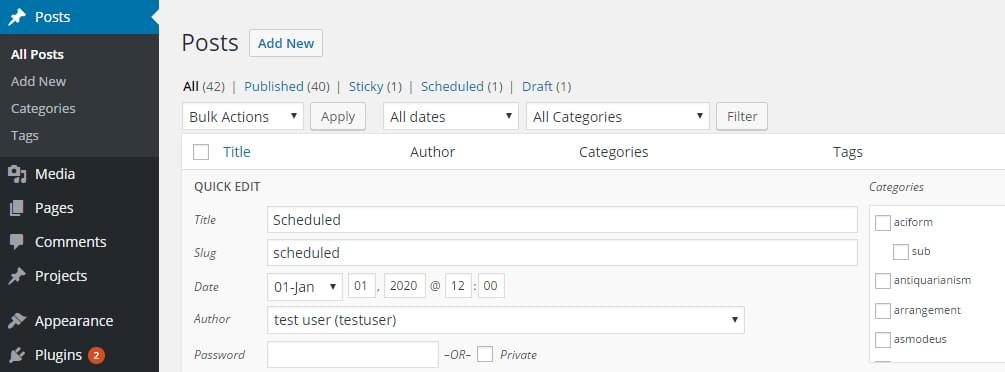
WordPressの管理画面にある「クイック編集」機能を使うと、記事のフル編集画面を開かずに素早く簡単に投稿内容を変更できます。
編集プロセスを迅速化するため、WordPressにはデフォルトでタイトル、スラッグ、タクソノミー、公開日、投稿ステータス選択のようなメタデータなどのフィールドが含まれています。ただし、ポストタイプを拡張している場合、これらは変更できません。本記事ではそのことについて説明します。
機能のプラグインを作成する
機能を編集するときは、プラグインの作成をお勧めします(プラグイン開発を始めたばかりなら、初心者向けガイドがあります)。プラグインのエントリポイントとして機能するクラスの作成から始めます。開始および実行のためには変更すべき点がいくつかあるので、基本的な構造から始めます。
/*
Plugin Name: Extend Quick Edit
Plugin URI: https://elevate360.com.au/plugins/extend-quick-edit
Description: Extends the quick-edit interface to display additional post meta
Version: 1.0.0
Author: Simon Codrington
Author URI: http://simoncodrington.com.au
Text Domain: post-quick-edit-extension
Domain Path: /languages
*/

class el_extend_quick_edit{

    private static $instance = null;

    public function __construct(){

        add_action('manage_post_posts_columns', array($this, 'add_custom_admin_column'), 10, 1); //add custom column
        add_action('manage_posts_custom_column', array($this, 'manage_custom_admin_columns'), 10, 2); //populate column
        add_action('quick_edit_custom_box', array($this, 'display_quick_edit_custom'), 10, 2); //output form elements for quickedit interface
        add_action('admin_enqueue_scripts', array($this, 'enqueue_admin_scripts_and_styles')); //enqueue admin script (for prepopulting fields with JS)
        add_action('add_meta_boxes', array($this, 'add_metabox_to_posts'), 10, 2); //add metabox to posts to add our meta info
        add_action('save_post', array($this, 'save_post'), 10, 1); //call on save, to update metainfo attached to our metabox

    }

    //adds a new metabox on our single post edit screen
    public function add_metabox_to_posts($post_type, $post){

    }
    //metabox output function, displays our fields, prepopulating as needed
    public function display_metabox_output($post){

    }
    //enqueue admin js to pre-populate the quick-edit fields
    public function enqueue_admin_scripts_and_styles(){

    }
    //Display our custom content on the quick-edit interface, no values can be pre-populated (all done in JS)
    public function display_quick_edit_custom($column){

    }
    //add a custom column to hold our data
    public function add_custom_admin_column($columns){

    }
    //customise the data for our custom column, it's here we pull in meatdata info
    public function manage_custom_admin_columns($column_name, $post_id){

    }
    //saving meta info (used for both traditional and quick-edit saves)
    public function save_post($post_id){

    }
    //gets singleton instance
    public static function getInstance(){
        if(is_null(self::$instance)){
            self::$instance = new self();
        }
        return self::$instance;
    }


}
$el_extend_quick_edit = el_extend_quick_edit::getInstance();
カスタムメタフィールドを追加する
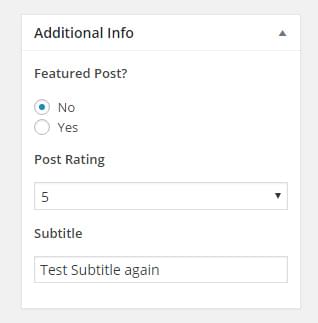
クイック編集画面の拡張は、投稿に新しいメタフィールドを追加することから始めます。ここでは例として、カスタムメタボックスを追加し、次のフォーム要素を出力します。
- 投稿を「注目記事」にするかどうか決定するチェックボックス。ユニークなスタイリングをするためにテーマのどこかで使用する
- 投稿の「評点づけ」に使用する番号リスト。選択要素として表示される。投稿の出力を特定のランキングまたはそれ以上のランキングに限定するために、テーマにより使用される
- 投稿のサブタイトルを置くためのシンプルなテキスト入力。投稿のメインタイトルの下に表示される
投稿タイプにはじめてカスタムメタフィールドを追加する場合、カスタムメタボックスまたはフィールドの追加について考察した最近の記事をよく読んでください。
//adds a new metabox on our single post edit screen
public function add_metabox_to_posts($post_type, $post){

    add_meta_box(
        'additional-meta-box',
        __('Additional Info', 'post-quick-edit-extension'),
        array($this, 'display_metabox_output'),
        'post',
        'side',
        'default'
    );
}
メタボックスが揃ったので、フィールドを追加します。すでに設定されている場合は、異なるフィールドのそれぞれにマークアップを出力したり値を事前選択または事前入力します。
//metabox output function, displays our fields, prepopulating as needed
public function display_metabox_output($post){

    $html = '';
    wp_nonce_field('post_metadata', 'post_metadata_field');

    $post_featured = get_post_meta($post->ID, 'post_featured', true);
    $post_rating = get_post_meta($post->ID, 'post_rating', true);
    $post_subtitle = get_post_meta($post->ID, 'post_subtitle', true);

    //Featured post (radio)
    $html .= '<p>';
        $html .= '<p><strong>Featured Post?</strong></p>';
        $html .= '<label for="post_featured_no">';
            if($post_featured == 'no' || empty($post_featured)){
                $html .= '<input type="radio" checked name="post_featured" id="post_featured_no" value="no"/>';
            }else{
                $html .= '<input type="radio" name="post_featured" id="post_featured_no" value="no"/>';
            }
        $html .= ' No</label>';
        $html .= '</br>';
        $html .= '<label for="post_featured_yes">';
            if($post_featured == 'yes'){
                $html .= '<input type="radio" checked name="post_featured" id="post_featured_yes" value="yes"/>';
            }else{
                $html .= '<input type="radio" name="post_featured" id="post_featured_yes" value="yes"/>';
            }
        $html .= ' Yes</label>';
    $html .= '</p>';

    //Internal Rating (select)
    $html .= '<p>';
        $html .= '<p>';
            $html .= '<label for="post_rating"><strong>Post Rating</strong></label>';
        $html .= '</p>';
        $html .= '<select name="post_rating" id="post_rating" value="' . $post_rating .'" class="widefat">';
            $html .= '<option value="1" ' . (($post_rating == '1') ? 'selected' : '') . '>1</option>';
            $html .= '<option value="2" ' . (($post_rating == '2') ? 'selected' : '') . '>2</option>';
            $html .= '<option value="3" ' . (($post_rating == '3') ? 'selected' : '') . '>3</option>';
            $html .= '<option value="4" ' . (($post_rating == '4') ? 'selected' : '') . '>4</option>';
            $html .= '<option value="5" ' . (($post_rating == '5') ? 'selected' : '') . '>5</option>';
        $html .= '</select>';

    $html .= '</p>';


    //Subtitle (text)
    $html .= '<p>';
        $html .= '<p>';
            $html .= '<label for="post_subtitle"><strong>Subtitle</strong></label>';
        $html .= '</p>';
        $html .= '<input type="text" name="post_subtitle" id="post_subtitle" value="' . $post_subtitle .'" class="widefat"/>';
    $html .= '</p>';


    echo $html;

}
ほとんどの出力は一目瞭然で、ノンスフィールドを表示してさまざまな値を移入したあとでフォームコントロールを出力しています。投稿を編集し、下の画像のようになるとコンテンツのすべてがメタボックス内部に表示されます。
新しいメタデータを保存する
新しいフィールドを追加するので、データを更新できるようにsave_postフックにフックします。この情報はカスタム列に表示され、最終的にはクイック編集コントロールの事前入力に使用されます。プラグインのsave_postメソッドに以下をコピーしてください。
//saving meta info (used for both traditional and quick-edit saves)
public function save_post($post_id){

    $post_type = get_post_type($post_id);

    if($post_type == 'post'){

        //check nonce set
        if(!isset($_POST['post_metadata_field'])){
            return false;
        }

        //verify nonce
        if(!wp_verify_nonce($_POST['post_metadata_field'], 'post_metadata')){
            return false;
        }


        //if not autosaving
        if ( defined( 'DOING_AUTOSAVE' ) && DOING_AUTOSAVE ) {
            return false;
        }

        //all good to save
        $featured_post = isset($_POST['post_featured']) ? sanitize_text_field($_POST['post_featured']) : '';
        $post_rating = isset($_POST['post_rating']) ? sanitize_text_field($_POST['post_rating']) : '';
        $post_subtitle = isset($_POST['post_subtitle']) ? sanitize_text_field($_POST['post_subtitle']) : '';

        update_post_meta($post_id, 'post_featured', $featured_post);
        update_post_meta($post_id, 'post_rating', $post_rating);
        update_post_meta($post_id, 'post_subtitle', $post_subtitle);
    }

}
関数の最初の部分は、ノンスが設定されているか、有効か確認します。このノンスはメタボックスの一番上に出力され、単純なセキュリティメソッドの機能を果たします。値を収集してサニタイズし、update_post_metaで保存します。
カスタム列を追加する
クイック編集画面にカスタム出力を追加するには、投稿管理画面に少なくとも1つのカスタム列がなければなりません。コンテンツの出力にあとで使用するフックは、カスタム管理列がある場合のみ動作するので、ほかに方法はありません。
(クイック編集出力関数には値を事前入力する機能がないため)メタデータのための投稿の現在値を出力するので、これらの列は重要です。以下をプラグインにコピーしてください。
//add a custom column to hold our data
public function add_custom_admin_column($columns){
    $new_columns = array();

    $new_columns['post_featured'] = 'Featured?';
    $new_columns['post_rating'] = 'Rating';
    $new_columns['post_subtitle'] = 'Subtitle';

    return array_merge($columns, $new_columns);
}
postコンテンツタイプに独自のカスタム列を追加するには、manage_post_posts_columnsフィルタにフックします。この例では3つの列を追加しますが、好きな数を追加できます。
現在の値を表示するために列を入力またはカスタムする
カスタム列が追加されたので、投稿からの値を入力します。列を入力できるように、manage_posts_custom_columnアクションにフックし、column_name変数を比較します。
ここで重要なのは、各メタ値をpost_featured_{$post_id}などのidを持つdivにラップしていることです。あとで現在のメタ値を取得し、クイック編集画面に出力されたフィールドを事前入力する必要がある場合を想定して、意図的にそうしています。
//customise the data for our custom column, it's here we pull in metadata info for each post. These will be referred to in our JavaScript file for pre-populating our quick-edit screen
public function manage_custom_admin_columns($column_name, $post_id){

    $html = '';

    if($column_name == 'post_featured'){
        $post_featured = get_post_meta($post_id, 'post_featured', true);

        $html .= '<div id="post_featured_' . $post_id . '">';
        if($post_featured == 'no' || empty($post_featured)){
            $html .= 'no';
        }else if ($post_featured == 'yes'){
            $html .= 'yes';
        }
        $html .= '</div>';
    }
    else if($column_name == 'post_rating'){
        $post_rating = get_post_meta($post_id, 'post_rating', true);

        $html .= '<div id="post_rating_' . $post_id . '">';
            $html .= $post_rating;
        $html .= '</div>';
    }
    else if($column_name == 'post_subtitle'){
        $post_subtitle = get_post_meta($post_id, 'post_subtitle', true);

        $html .= '<div id="post_subtitle_' . $post_id . '">';
            $html .= $post_subtitle;
        $html .= '</div>';
    }

    echo $html;
}
クイック編集インターフェイスのカスタマイズ
このセクションをカスタマイズするには、quick_edit_custom_boxアクションにフックする必要があります。このアクションは管理インターフェイスの各投稿にトリガーされており、すべてのデフォルトクイックアクションをレンダリングし、独自カスタムしたものを追加するためにアクセスできるようにします。
この関数は、登録されているすべてのカスタム列のために1度呼び出されます。インターフェイスを拡張するためにフックするのはここです。
//Display our custom content on the quick-edit interface, no values can be pre-populated (all done in JavaScript)
public function display_quick_edit_custom($column){

    $html = '';
    wp_nonce_field('post_metadata', 'post_metadata_field');

    //output post featured checkbox
    if($column == 'post_featured'){
        $html .= '<fieldset class="inline-edit-col-left clear">';
            $html .= '<div class="inline-edit-group wp-clearfix">';
                $html .= '<label class="alignleft" for="post_featured_no">';
                    $html .= '<input type="radio" name="post_featured" id="post_featured_no" value="no"/>';
                $html .= '<span class="checkbox-title">Post Not Featured</span></label>';
                $html .= '<label class="alignleft" for="post_featured_yes">';
                    $html .= '<input type="radio" name="post_featured" id="post_featured_yes" value="yes"/>';
                $html .= '<span class="checkbox-title">Post Featured</span></label>';

            $html .= '</div>';
        $html .= '</fieldset>';
    }
    //output post rating select field
    else if($column == 'post_rating'){
        $html .= '<fieldset class="inline-edit-col-center ">';
            $html .= '<div class="inline-edit-group wp-clearfix">';
                $html .= '<label class="alignleft" for="post_rating">Post Rating</label>';
                $html .= '<select name="post_rating" id="post_rating" value="">';
                    $html .= '<option value="1">1</option>';
                    $html .= '<option value="2">2</option>';
                    $html .= '<option value="3">3</option>';
                    $html .= '<option value="4">4</option>';
                    $html .= '<option value="5">5</option>';
                $html .= '</select>';
            $html .= '</div>';
        $html .= '</fieldset>';
    }
    //output post subtitle text field
    else if($column == 'post_subtitle'){
        $html .= '<fieldset class="inline-edit-col-right ">';
            $html .= '<div class="inline-edit-group wp-clearfix">';
                $html .= '<label class="alignleft" for="post_rating">Post Subtitle</label>';
                $html .= '<input type="text" name="post_subtitle" id="post_subtitle" value="" />';
            $html .= '</div>';
        $html .= '</fieldset>';
    }

    echo $html;
}
フィールドを出力するための全体的なプロセスは、メタボックスの場合と同様です。注目記事のチェックボックス、評価選択フィールド、テキスト入力コントロールを表示します。要素に使用するクラスは、WordPressがレイアウトに使用するものと同じです。特定のスタイルの場合は試す必要はありますが、inline-edit-col-left、inline-edit-col-center、inline-edit-col-rightを使用すると、レイアウトは整列されます。
JavaScriptファイルのエンキュー
WordPressが投稿管理画面を出力している場合は、クイック編集インターフェイスは作成されません。ユーザーが「編集」ボタンを押すと、WordPressは編集コントロールを動的に作成し、タイトル、スラッグ、投稿者などの情報を入力します。
これはすべて動的なので、メタデータをPHPでは出力できず、JavaScriptを使用して値を収集しなければなりません。

管理者用JavaScriptファイルをインクルードするには、以下の関数を追加します。私はこれをプラグインのベースディレクトリに追加しましたが、専用のJavaScriptフォルダに加えたい場合は構造を変更できます。
public function enqueue_admin_scripts_and_styles(){
    wp_enqueue_script('quick-edit-script', plugin_dir_url(__FILE__) . '/post-quick-edit-script.js', array('jquery','inline-edit-post' ));
}
クイック編集画面へ動的に値を入力する
先に使用したquick_edit_custom_boxアクションは、クイック編集コントロールのすべてのフォームコントロールを出力します。しかし前述のとおり、JavaScriptで動的にコントロールされるので、メタフィールドの自動的な事前入力はできません。
値を取得できる方法は2つあります。
- カスタムメソッドを作成:editアクションにフックし、登録した関数にAjax呼び出しをトリガーする。動作させるには、クイック編集インターフェイスから投稿IDを渡し、それから値を取得して返すためにget_post_meta関数を使用する
- WordPressの既存の関数を利用:カスタム値を収集するには、WordPressの既存のJavaScript関数をコピーして拡張する
最初のメソッドは良いのですが、さらに情報を得るにはサーバーへの往復をともなう準備がもう少し必要です。2つめのオプションはもう少し簡単で、クイック編集ボックスのレンダリングに使用されるJavaScript関数をフックしてから、メタデータの収集に拡張できます。ここではこの手段を選びます。
新しくエンキューしたJavaScriptファイルを開き、以下の行を追加します。どのように機能するか簡単に見てみます。
/*
 * Post Bulk Edit Script
 * Hooks into the inline post editor functionality to extend it to our custom metadata
 */

jQuery(document).ready(function($){

    //Prepopulating our quick-edit post info
    var $inline_editor = inlineEditPost.edit;
    inlineEditPost.edit = function(id){

        //call old copy
        $inline_editor.apply( this, arguments);

        //our custom functionality below
        var post_id = 0;
        if( typeof(id) == 'object'){
            post_id = parseInt(this.getId(id));
        }

        //if we have our post
        if(post_id != 0){

            //find our row
            $row = $('#edit-' + post_id);

            //post featured
            $post_featured = $('#post_featured_' + post_id);
            post_featured_value = $post_featured.text();
            if(post_featured_value == 'yes'){
                $row.find('#post_featured_yes').val(post_featured_value).attr('checked', true);
            }else{
                $row.find('#post_featured_no').val(post_featured_value).attr('checked', true);
            }

            //post rating
            $post_rating = $('#post_rating_' + post_id);
            $post_rating_value = $post_rating.text();
            $row.find('#post_rating').val($post_rating_value);
            $row.find('#post_rating').children('[value="' + $post_rating_value + '"]').attr('selected', true);

            //post subtitle
            $post_subtitle= $('#post_subtitle_' + post_id);
            post_subtitle_value = $post_subtitle.text();
            $row.find('#post_subtitle').val(post_subtitle_value);


        }

    }

});
inlineEditPost.editを持つインライン編集オブジェクトの取得から始めます。このコピーを保持して機能を置き換えます。新しい関数の内部で、$inline_editor.apply( this, arguments);を使って古い関数を呼び出して、クイック編集ボックスを作成するためのデフォルトのWordPressの機能が維持されることを保証します。
現時点では機能をトリガーできます。関数に渡されるid変数がobjectであることを確認し、その変数からpost_idを取得します。
メタデータが保存される場所であるカスタム管理列を探すためにpost_idを使用します。たとえば投稿2100を編集しているとき、post_rating_2100のIDを持つ列を見つけることで投稿の評価を探せます。
すべての値を見つけ、値に応じてフォームコントロールに事前入力します。もっと多くのフィールドがある場合は、さらに拡張するために同じロジックを使用できます。
ユーザーが更新ボタンをクリックすると、Ajaxリクエストが作動し、投稿呼び出しの保存をトリガーします。これは以前にフックしたsave_post関数をトリガーし、新しいメタ値の更新を管理します。
最後に
お分かりのとおり、クイック編集インターフェイスのカスタマイズには、必要なステップがいくつかありました。
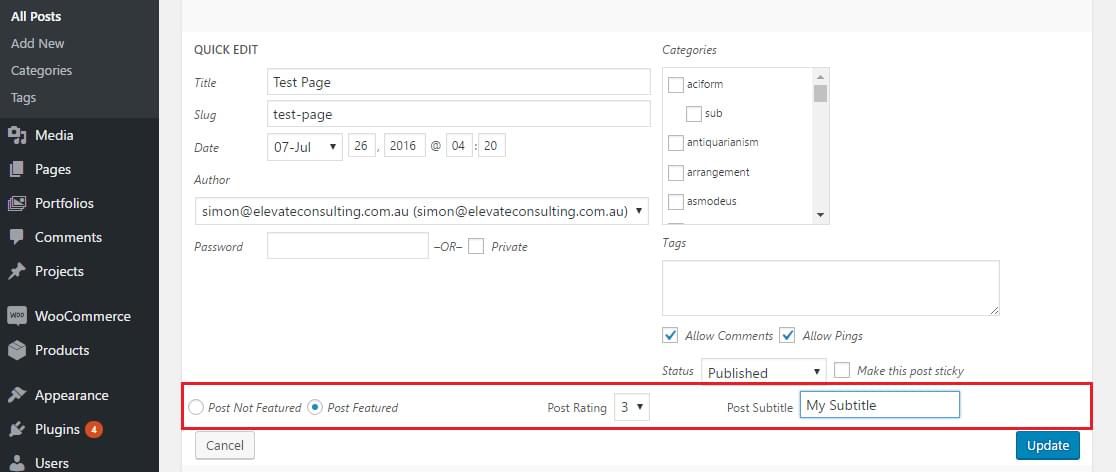
インターフェイス自体は素晴らしいツールで、投稿にいろいろな種類のメタフィールドを追加している場合に、それらをクイック編集インターフェイスに拡張するのは良い考えです。手動で入力する必要はなく投稿を管理できると大幅な時間節約となり、サイトの管理をとても簡単にします。
必要な情報をクイック編集フィールドに出力できるので、この記事で説明したことを生かして、もっとカスタマイズしたソリューションを提供すべく拡張できます。
(原文:Extend the Quick Edit Actions in the WordPress Dashboard)
[翻訳:柴田理恵/編集:Livit]


