本記事はWern Anchetaが査読を担当しています。最高のコンテンツに仕上げるために尽力してくれたSitePointの査読担当者のみなさんに感謝します。
ドキュメントやファイルの保管は、コンピューターが発明されたときから今まで変わらずに重要なことです。かつてはローカルに保管していましたが、ここ最近ではクラウドでの保存が増えてきたようです。クラウドにはいくつかの問題はあるものの、低コストでほとんど容量を気にする必要がありません。
この記事では、AndroidのJava 6+向けDropbox Core SDK(ソフトウェア開発キット)を使用して、AndroidアプリからどのようにしてDropboxに保存するかを説明します。 SDKの記述によると、Core SDKはJavaライブラリーであり、Dropbox’s HTTP-based Core API v2にアクセスできます。また旧型のCore API v1 もサポートしていますが、いずれサポートは終了する予定です。
GitHubでこのプロジェクトのコードを確認できます。
Dropboxに接続するには、Dropboxのアカウントを作ってから、Dropbox APIを使う必要があります。App Consoleで新しいアプリを作ってみましょう。
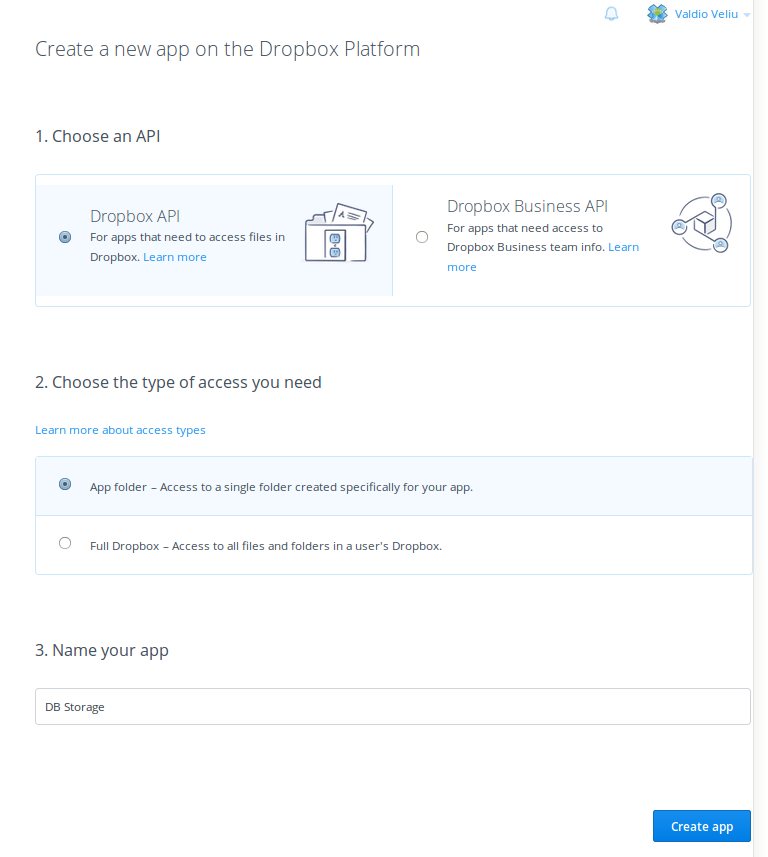
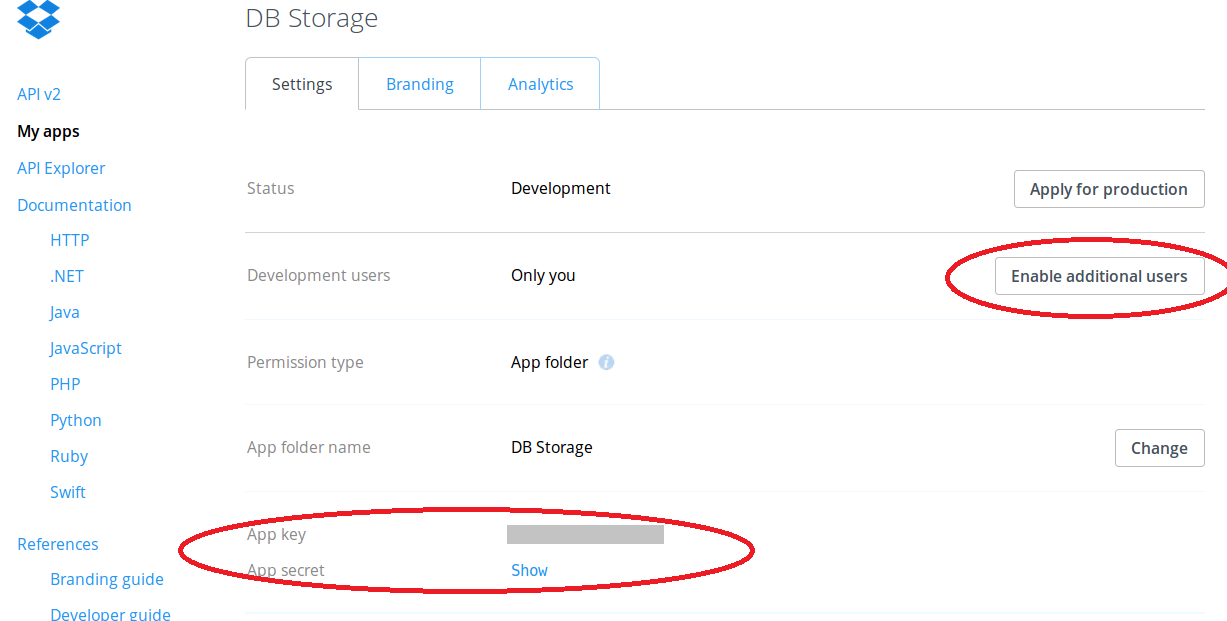
新しいアプリの作成に入ると、開発ステータスになります。このステータスでは、アプリはテストユーザーのみ使用できますが、Enable Additional Usersを設定すると、最大100人まで使用可能です。アプリの準備が整ったら、制作ステータスを適用します。
アプリのコンソールにはアプリの情報があり、AndroidプロジェクトにはApp Keyが必要になります。
許可を追加
Android Studio(Login Activityで選択)でプロジェクトを作成し、AndroidManifest.xml内にインターネットとストレージへのアクセス許可を得るために、下記のコードを追加します。AndroidManifest.xmlの自動生成許可は 、このプロジェクトでは不要なのでLoginActivityで削除します。
<uses-permission android:name="android.permission.INTERNET" />
<uses-permission android:name="android.permission.WRITE_EXTERNAL_STORAGE" />
<uses-permission android:name="android.permission.READ_EXTERNAL_STORAGE" />
依存性を追加
build.gradle(Module: app)では、以下のコードを追加します。
dependencies {
    //...
    compile 'com.dropbox.core:dropbox-core-sdk:2.0.1'
    compile 'com.squareup.picasso:picasso:2.5.2'
}
注意: compile 'com.dropbox.core:dropbox-core-sdk:2.0.1'はDropbox Core API向けです。Picassoライブラリーは必須ではありませんが、読み込み画像の設定時に便利です。
Dropboxアクティビティーを追加
AndroidManifest.xmlを開き、<application></application>セクションにAuthActivityを追加します。
<application>
...
    <!-- Dropbox AuthActivity -->
    <activity
        android:name="com.dropbox.core.android.AuthActivity"
        android:configChanges="orientation|keyboard"
        android:launchMode="singleTask">
        <intent-filter>

            <!-- Insert your app key after “db-  ...” -->
            <data android:scheme="db-APP_KEY" />

            <action android:name="android.intent.action.VIEW" />

            <category android:name="android.intent.category.BROWSABLE" />
            <category android:name="android.intent.category.DEFAULT" />
        </intent-filter>
    </activity>
</application>
複製ファイルエラー
アプリのテスト中、エラーに遭遇しました。stackoverflow(訳注:プログラミングに関する多くのQ&Aが掲載されているサイト)で検索すると、複数のLicense.txtかNotice.txtファイル構築中のコンフリクトが原因と分かりました。コンフリクトを避けるために、build.gradle(Module: app)、android{…}のセクションでは、これらのファイルを削除します。
android {
...

  packagingOptions {
      exclude 'META-INF/LICENSE'
      exclude 'META-INF/LICENSE.txt'
      exclude 'META-INF/NOTICE'
      exclude 'META-INF/NOTICE.txt'
  }
}
App key
App keyをstrings.xmlに追加します。
<!-- Change this to your app key -->
<string name="APP_KEY">APP_KEY_HERE</string>
Androidのプロジェクトは、Dropbox APIを使用したり、新しいアクティビティーをプロジェクトに追加する場合、File->New->Activity->Basic Activityで設定できます。MainActivity.javaと呼ばれます。
プロジェクト記述
サンプルアプリは、ユーザーのDropboxアカウントにログインしたり、詳細情報を入手したり、アプリのDropboxフォルダーに画像をアップロードしたりできるようになります。プロジェクトはLoginActivityとMainActivityの2種類のアクティビティーを含みます。
Dropboxでログイン
LoginActivityのタスクは複雑ではありません。ボタンをクリックすると、ログインタスクを実行し、アクセストークンをDropboxアプリ用に生成します。このDropboxアプリは文字列リソース内のAPP_KEYで認識されたものです。
startOAuth2Authentication()メソッドで、DropboxのAuthActivityを開きます。Manifestファイルに追加されたアクティビティーです。AuthActivityでは、ユーザーはDropboxのアカウントを確認しないといけません。ユーザーによるDropboxアカウントの確認が終わると、アカウントをLoginActivityにリダイレクトします。
startOAuth2Authentication()メソッドでは、アクセストークンを返さず、 代わりにAuthActivityのみを開いて内部認証に使います。これでユーザーは認証されるので、アクセストークンが必要になります。
AuthActivity
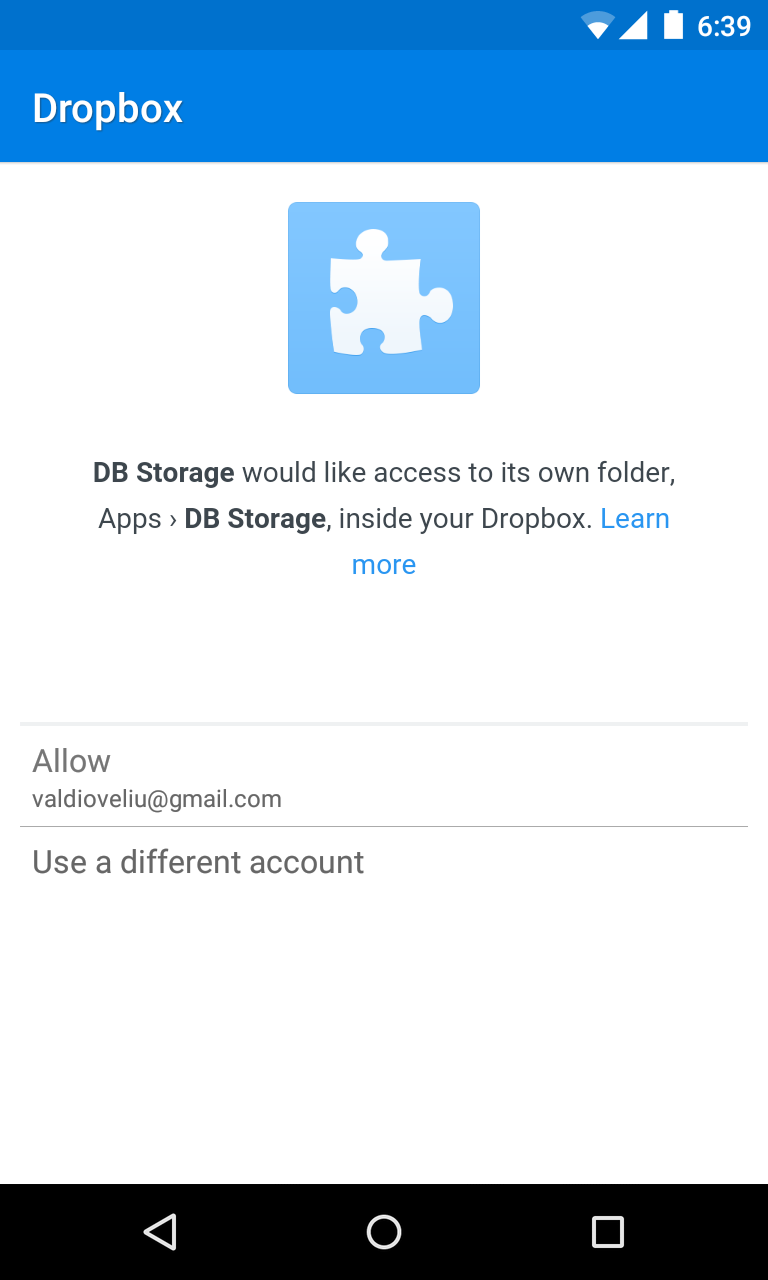
LoginActivityでは、次のコードのようにプロジェクトパッケージ名以外の自動生成コードをすべて置き換えます。
public class LoginActivity extends AppCompatActivity {
    @Override
    protected void onCreate(Bundle savedInstanceState) {
        super.onCreate(savedInstanceState);
        setContentView(R.layout.activity_login);

        Button SignInButton = (Button) findViewById(R.id.sign_in_button);
        SignInButton.setOnClickListener(new OnClickListener() {
            @Override
            public void onClick(View view) {
                Auth.startOAuth2Authentication(getApplicationContext(), getString(R.string.APP_KEY));
            }
        });
    }

    @Override
    protected void onResume() {
        super.onResume();
        getAccessToken();
    }

    public void getAccessToken() {
        String accessToken = Auth.getOAuth2Token(); //generate Access Token
        if (accessToken != null) {
            //Store accessToken in SharedPreferences
            SharedPreferences prefs = getSharedPreferences("com.example.valdio.dropboxintegration", Context.MODE_PRIVATE);
            prefs.edit().putString("access-token", accessToken).apply();

            //Proceed to MainActivity
            Intent intent = new Intent(LoginActivity.this, MainActivity.class);
            startActivity(intent);
        }
    }
}
このアクティビティーのレイアウトでは、activity_login.xmlを次のようにアップデートします。
<RelativeLayout xmlns:android="http://schemas.android.com/apk/res/android"
    xmlns:tools="http://schemas.android.com/tools"
    android:layout_width="match_parent"
    android:layout_height="match_parent"
    tools:context="com.example.valdio.dropboxintegration.LoginActivity">
    <!-- Update package name -->

    <Button
        android:id="@+id/sign_in_button"
        android:layout_width="wrap_content"
        android:layout_height="wrap_content"
        android:text="@string/sign_in"
        android:layout_centerVertical="true"
        android:layout_centerHorizontal="true" />
</RelativeLayout>
ボタンテキストの表示用に、strings.xmlに次のコードを追記します。
...
<string name="sign_in">Sign in</string>
LoginActivityのonResume()ライフサイクルメソッドは、 getOAuth2Token()メソッドを呼び出してトークンを要求します。トークンはアプリのSharedPreferencesデータ内に今後のために保管され、次にMainActivityが開きます。
onResume()ライフサイクルメソッドはアプリをはじめて起動する前に呼び出されていました。なぜそのときにトークンを取得しなかったのでしょう?
理由は、アプリをはじめて起動したときにはユーザーが認証されていなかったからです。認証が成功し、AuthActivityからリダイレクトしたとき、onResume()メソッドはもう一度呼び出され、アクセストークンを生成します。
Dropboxクライアントでログイン
MainActivityには、下記の変数を記述します。
public class MainActivity extends AppCompatActivity {

    private static final int IMAGE_REQUEST_CODE = 101;
    private String ACCESS_TOKEN;
    ...
}
MainActivityのcontent_main.xmlレイアウトでは、ファイルはコンテンツを以下のように置き換えます。
<?xml version="1.0" encoding="utf-8"?>
<RelativeLayout xmlns:android="http://schemas.android.com/apk/res/android"
    xmlns:app="http://schemas.android.com/apk/res-auto"
    xmlns:tools="http://schemas.android.com/tools"
    android:layout_width="match_parent"
    android:layout_height="match_parent"
    android:paddingBottom="@dimen/activity_vertical_margin"
    android:paddingLeft="@dimen/activity_horizontal_margin"
    android:paddingRight="@dimen/activity_horizontal_margin"
    android:paddingTop="@dimen/activity_vertical_margin"
    app:layout_behavior="@string/appbar_scrolling_view_behavior"
    tools:context="valdioveliu.valdio.com.dropboxintegration.MainActivity"
    tools:showIn="@layout/activity_main">

    <LinearLayout xmlns:android="http://schemas.android.com/apk/res/android"
        android:layout_width="match_parent"
        android:layout_height="wrap_content"
        android:orientation="vertical"
        android:id="@+id/accountData">

        <ImageView
            android:id="@+id/imageView"
            android:layout_width="match_parent"
            android:layout_height="wrap_content"
            android:layout_alignParentTop="true"
            android:layout_centerHorizontal="true" />

        <TextView
            android:id="@+id/textView3"
            android:layout_width="wrap_content"
            android:layout_height="wrap_content"
            android:layout_alignParentLeft="true"
            android:layout_alignParentStart="true"
            android:layout_below="@+id/imageView"
            android:layout_marginLeft="15dp"
            android:layout_marginTop="50dp"
            android:text="Name"
            android:textAppearance="?android:attr/textAppearanceLarge" />

        <TextView
            android:id="@+id/name_textView"
            android:layout_width="match_parent"
            android:layout_height="wrap_content"
            android:layout_alignParentLeft="true"
            android:layout_alignParentStart="true"
            android:gravity="center_horizontal"
            android:text=""
            android:textAppearance="?android:attr/textAppearanceLarge" />

        <TextView
            android:id="@+id/textView"
            android:layout_width="wrap_content"
            android:layout_height="wrap_content"
            android:layout_alignParentLeft="true"
            android:layout_alignParentStart="true"
            android:layout_below="@+id/textView3"
            android:layout_marginLeft="15dp"
            android:layout_marginTop="58dp"
            android:text="Email"
            android:textAppearance="?android:attr/textAppearanceLarge" />

        <TextView
            android:id="@+id/email_textView"
            android:layout_width="match_parent"
            android:layout_height="wrap_content"
            android:layout_alignParentLeft="true"
            android:layout_alignParentStart="true"
            android:layout_below="@+id/textView"
            android:gravity="center_horizontal"
            android:text=""
            android:textAppearance="?android:attr/textAppearanceLarge" />
    </LinearLayout>
</RelativeLayout>
アカウント情報
ユーザーアカウント情報の入手、Dropboxへのアクセスはネットワークリクエストであり、Androidでは非同期処理されます。このネットワークリクエストはDropboxクライアントを常に要求しています。
DropboxClient.javaを作成し、下記のコードを追記します。
public class DropboxClient {

    public static DbxClientV2 getClient(String ACCESS_TOKEN) {
        // Create Dropbox client
        DbxRequestConfig config = new DbxRequestConfig("dropbox/sample-app", "en_US");
        DbxClientV2 client = new DbxClientV2(config, ACCESS_TOKEN);
        return client;
    }
}
getClient()メソッド内のACCESS_TOKEN文字列はユーザーがログイン中に受け取ったトークンです。
次のタスクは、ユーザーアカウントの詳細を入手する方法です。UserAccountTaskクラスはアカウント詳細リクエストを表示します。この非同期クラスのコンストラクターは、TaskDelegateのインターフェイスパラメーターを持ち、タスク実行中のアクティビティーにアカウント情報を返します。
UserAccountTask.javaを作成し、以下のコードを追加します。
public class UserAccountTask extends AsyncTask<Void, Void, FullAccount>  {

    private DbxClientV2 dbxClient;
    private TaskDelegate  delegate;
    private Exception error;

    public interface TaskDelegate {
        void onAccountReceived(FullAccount account);
        void onError(Exception error);
    }

    UserAccountTask(DbxClientV2 dbxClient, TaskDelegate delegate){
        this.dbxClient =dbxClient;
        this.delegate = delegate;
    }

    @Override
    protected FullAccount doInBackground(Void... params) {
        try {
            //get the users FullAccount
            return dbxClient.users().getCurrentAccount();
        } catch (DbxException e) {
            e.printStackTrace();
            error = e;
        }
        return null;
    }

    @Override
    protected void onPostExecute(FullAccount account) {
        super.onPostExecute(account);

        if (account != null && error == null){
            //User Account received successfully
            delegate.onAccountReceived(account);
        }
        else {
            // Something went wrong
            delegate.onError(error);
        }
    }
}
getUserAccountメソッドは、 MainActivityクラス内でどのようにUserAcountTaskクラスが実行されるかの例です。
次のメソッドをMainActivityクラスに追加します。あとで使用します。
protected void getUserAccount() {
    if (ACCESS_TOKEN == null)return;
    new UserAccountTask(DropboxClient.getClient(ACCESS_TOKEN), new UserAccountTask.TaskDelegate() {
        @Override
        public void onAccountReceived(FullAccount account) {
            //Print account's info
            Log.d("User", account.getEmail());
            Log.d("User", account.getName().getDisplayName());
            Log.d("User", account.getAccountType().name());
            updateUI(account);
        }
        @Override
        public void onError(Exception error) {
            Log.d("User", "Error receiving account details.");
        }
    }).execute();
}
ユーザーアカウントの詳細を操作画面に表示するには、以下の機能をMainActivityクラスに追加します。
private void updateUI(FullAccount account) {
  ImageView profile = (ImageView) findViewById(R.id.imageView);
  TextView name = (TextView) findViewById(R.id.name_textView);
  TextView email = (TextView) findViewById(R.id.email_textView);

  name.setText(account.getName().getDisplayName());
  email.setText(account.getEmail());
  Picasso.with(this)
          .load(account.getProfilePhotoUrl())
          .resize(200, 200)
          .into(profile);
}
Dropboxへアップロード
アップロードタスクはInputStreamによって発生します。指定されたファイルはCore SDKとDropboxのアプリフォルダにアップロードされたストリームによってInputStreamに変換されます。
UploadTask.javaを作成し、次のコードを追加します。
public class UploadTask extends AsyncTask {

    private DbxClientV2 dbxClient;
    private File file;
    private Context context;

    UploadTask(DbxClientV2 dbxClient, File file, Context context) {
        this.dbxClient = dbxClient;
        this.file = file;
        this.context = context;
    }

    @Override
    protected Object doInBackground(Object[] params) {
        try {
            // Upload to Dropbox
            InputStream inputStream = new FileInputStream(file);
            dbxClient.files().uploadBuilder("/" + file.getName()) //Path in the user's Dropbox to save the file.
                    .withMode(WriteMode.OVERWRITE) //always overwrite existing file
                    .uploadAndFinish(inputStream);
            Log.d("Upload Status", "Success");
        } catch (DbxException e) {
            e.printStackTrace();
        } catch (IOException e) {
            e.printStackTrace();
        }
        return null;
    }

    @Override
    protected void onPostExecute(Object o) {
        super.onPostExecute(o);
        Toast.makeText(context, "Image uploaded successfully", Toast.LENGTH_SHORT).show();
    }
}
注意:Android Studioはインポートのコンフリクトを伝えるプロンプトを表示するので、File変数用にjava.io.Fileをインポートする必要があります。
アップロード機能確認のため、画像をアップロードします。別のアクティビティーで結果を受信し、画像を入手できます。
次のメソッドをMainActivityに追記します。
private void upload() {
  if (ACCESS_TOKEN == null)return;
  //Select image to upload
  Intent intent = new Intent();
  intent.setType("image/*");
  intent.setAction(Intent.ACTION_GET_CONTENT);
  intent.putExtra(Intent.EXTRA_LOCAL_ONLY, true);
  startActivityForResult(Intent.createChooser(intent,
          "Upload to Dropbox"), IMAGE_REQUEST_CODE);
}
startActivityForResult()を呼び出す際、onActivityResult()メソッドを実行し、 MainActivityの結果を処理しないといけません。有効な画像のURIの取得後、ファイルを作成してからUploadTaskを実行します。
次のメソッドをMainActivityに追加します。
@Override
protected void onActivityResult(int requestCode, int resultCode, Intent data) {
  super.onActivityResult(requestCode, resultCode, data);
  if (resultCode != RESULT_OK || data == null) return;
  // Check which request we're responding to
  if (requestCode == IMAGE_REQUEST_CODE) {
      // Make sure the request was successful
      if (resultCode == RESULT_OK) {
          //Image URI received
          File file = new File(URI_to_Path.getPath(getApplication(), data.getData()));
          if (file != null) {
              //Initialize UploadTask
              new UploadTask(DropboxClient.getClient(ACCESS_TOKEN), file, getApplicationContext()).execute();
          }
      }
  }
}
onActivityResult()メソッドでは、URI_to_Path.getPath(getApplication(), data.getData())がパラメーターです。URI_to_Pathのjavaクラスはヘルパークラスで、ファイルのURIを絶対パスに変換します。この方法はstackoverflow(訳注:プログラミングに関する多くのQ&Aが掲載されているサイト)を参考にしています。
こちらは大きなクラスで、この記事とは直接関係がありませんので、URI_to_Path.javaを作成してから、ここのコードを追加してください。パッケージ名を変更するのを忘れないでください。
ようやくonCreate()メソッドです。次のコードをMainActivityに追加して入れ替えます。
@Override
protected void onCreate(Bundle savedInstanceState) {
    super.onCreate(savedInstanceState);
    setContentView(R.layout.activity_main);
    Toolbar toolbar = (Toolbar) findViewById(R.id.toolbar);
    setSupportActionBar(toolbar);

    if (!tokenExists()) {
        //No token
        //Back to LoginActivity
        Intent intent = new Intent(MainActivity.this, LoginActivity.class);
        startActivity(intent);
    }

    ACCESS_TOKEN = retrieveAccessToken();
    getUserAccount();

    FloatingActionButton fab = (FloatingActionButton) findViewById(R.id.fab);
    fab.setOnClickListener(new View.OnClickListener() {
        @Override
        public void onClick(View view) {
            upload();
        }
    });
}
アプリを開くときはいつも、アクセストークンがあるか確認する必要があります。トークンが存在する場合、 SharedPreferencesから読み込みます。これらのメソッドをMainActivityに追加します。
private boolean tokenExists() {
    SharedPreferences prefs = getSharedPreferences("com.example.valdio.dropboxintegration", Context.MODE_PRIVATE);
    String accessToken = prefs.getString("access-token", null);
    return accessToken != null;
}

private String retrieveAccessToken() {
    //check if ACCESS_TOKEN is stored on previous app launches
    SharedPreferences prefs = getSharedPreferences("com.example.valdio.dropboxintegration", Context.MODE_PRIVATE);
    String accessToken = prefs.getString("access-token", null);
    if (accessToken == null) {
        Log.d("AccessToken Status", "No token found");
        return null;
    } else {
        //accessToken already exists
        Log.d("AccessToken Status", "Token exists");
        return accessToken;
    }
}
最後に
AndroidとDropbox v2 APIを統合する基本的な説明をしました。このトピックについてさらに知りたい人は、Dropbox for Javaのドキュメント、SDKのソース・実例をご覧ください。
(原文:Adding Dropbox to an Android App)
[翻訳:中野汐里]
[編集:Livit]
Image:iJeab / Shutterstock.com


