
本記事はFIXERが提供する「cloud.config Tech Blog」に掲載された「自分が思う一番簡単な方法でAzureMLのAutoMLでMLOpsを組んだ #Azureリレー」を再編集したものです。
こんにちは四日市事業所の河口です。
今回は新しいAzure Machine LearningとAzure DevOpsを使って自動的にAutoMLで作成したモデルをAzure Container Instancesにデプロイしていきます。
準備
学習のデータセットは以下のものを使用しました。
http://archive.ics.uci.edu/ml/datasets/Iris
ダウンロードしたファイルの拡張子をcsvにしておき、先頭に以下のパラメータ名を追加します。
| sepal_length | sepal_width | petal_length | petal_width | class |
Azure DevOpsと連携するのでgithubか何かのリポジトリに以下のコードを上げておきます。
ServicePrincipalAuthenticationに入力するデータは後程説明します。
condaEnv.yml
name: project_environment
dependencies:
  # The python interpreter version.
  # Currently Azure ML only supports 3.5.2 and later.
- python=3.6.2
- psutil=5.3

- pip:
  - azureml-sdk[notebooks]
  - pandas==0.23.4
  - joblib
  - azureml-defaults
  - azureml.automl.runtime
deploymentConfig.yml
---
containerResourceRequirements:
  cpu: 1
  memoryInGB: 2
computeType: ACI
location: japaneast
inferenceConfig.yml
entryScript: score.py
runtime: python
condaFile: condaEnv.yml
schemaFile:
sourceDirectory:
enableGpu: False
baseImage:
baseImageRegistry:
trainAndCreatemodel.py
from azureml.train.automl import AutoMLConfig
from azureml.core import Workspace, Dataset
from azureml.core.experiment import Experiment
from azureml.core.model import Model
from azureml.core.authentication import ServicePrincipalAuthentication

auth = ServicePrincipalAuthentication(
    tenant_id="",
    service_principal_id="",
    service_principal_password="")

subscription_id = ''
resource_group = ''
workspace_name = ''

ws = Workspace(subscription_id, resource_group, workspace_name, auth=auth)

train_data = Dataset.get_by_name(ws, name='')

label = "class"

automl_classifier = AutoMLConfig(
    task='classification',
    primary_metric='AUC_weighted',
    experiment_timeout_minutes=30,
    blacklist_models='XGBoostClassifier',
    training_data=train_data,
    label_column_name=label,
    n_cross_validations=2)

experiment_name = ''

experiment = Experiment(ws, experiment_name)

run = experiment.submit(automl_classifier, show_output=True)

description = ''

model = run.register_model(description=description,
                           model_name='')
score.py
import pickle
import json
import pandas as pd
import joblib
from azureml.core.model import Model
from azureml.core import Workspace, Dataset
from azureml.core.authentication import ServicePrincipalAuthentication


def init():
    global model
    global ws

    try:
        auth = ServicePrincipalAuthentication(
        tenant_id="",
        service_principal_id="",
        service_principal_password="")

        subscription_id = ''
        resource_group = ''
        workspace_name = ''

        ws = Workspace(subscription_id, resource_group,
                       workspace_name, auth=auth)

        model_path = Model.get_model_path(
            '', _workspace=ws)

        model = joblib.load(model_path)
    except Exception as e:
        print(e)


def run(raw_data):
    try:
        data = json.loads(raw_data)["data"]
        data = pd.DataFrame(data)
        data.columns = ['sepal_length', 'sepal_width',
                        'petal_length', 'petal_width']

        result = model.predict(data)
        return json.dumps({"result": result.tolist()})
    except Exception as e:
        result = str(e)
        return json.dumps({"error": result})


if __name__ == "__main__":
    init()

    test_data = '{"data":[[0,0,0,0]]}'
    prediction = run(test_data)
    print("Test result: ", prediction)
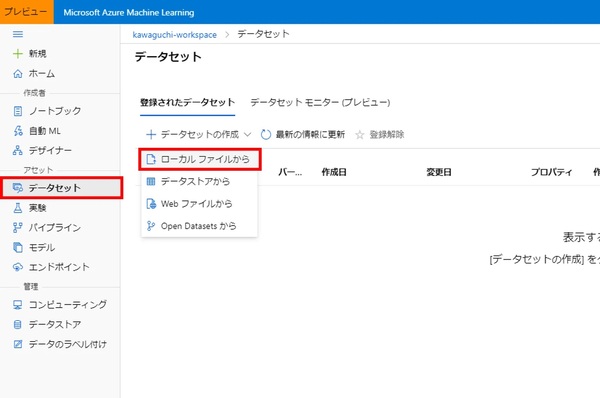
構築
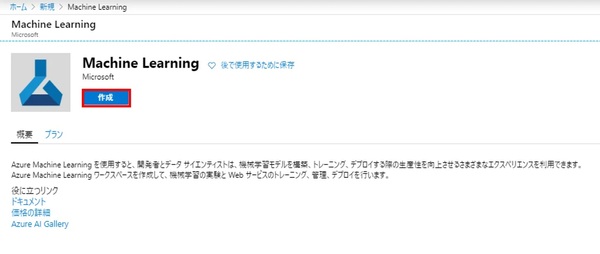
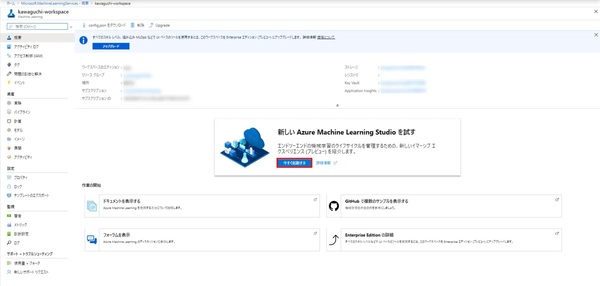
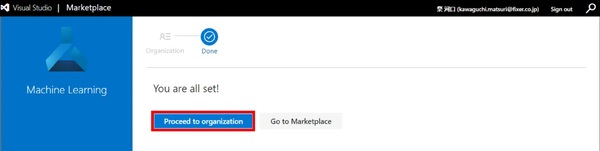
1.Azure MLのワークスペース作成
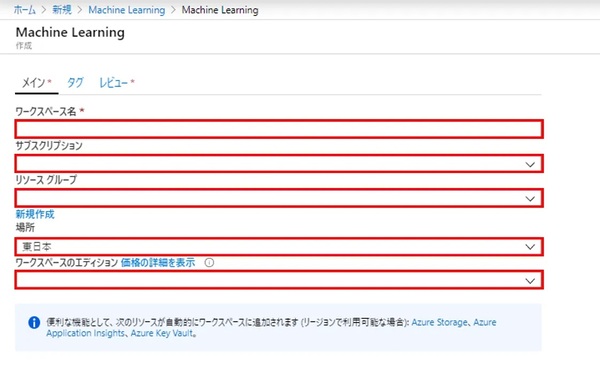
2.各項目を入力
3.新しい Azure Machine Learning Studioを起動
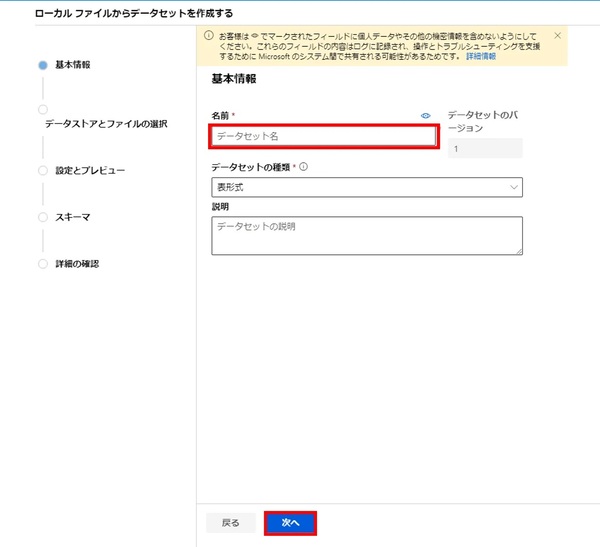
4.データセット作成のローカルファイルからを選択
5.データセット名を入力し次へ
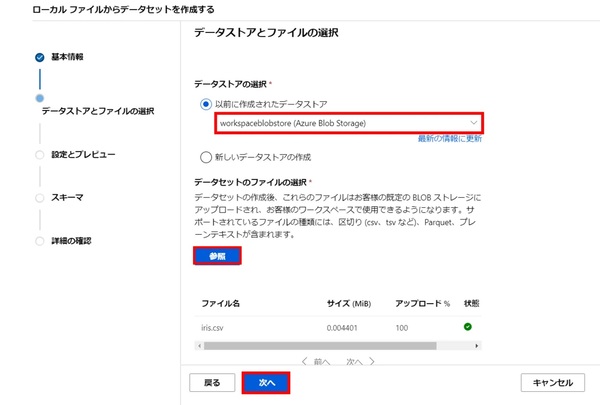
6.データストアを選択した後、参照からデータセットのファイル(Iris.csv)をアップロードし次へ
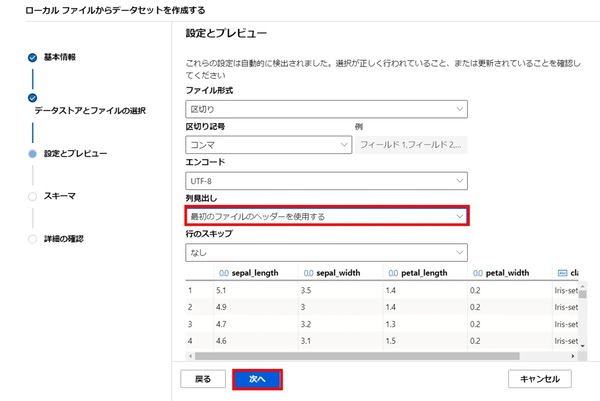
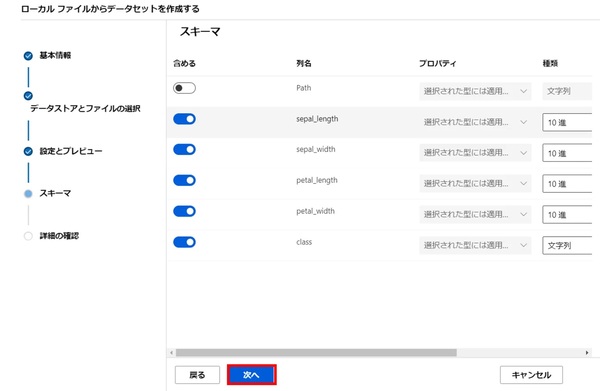
7.列見出しを最初のファイルのヘッダーを使用するを選択し次へ
8.入力する列や種類を決定し次へ
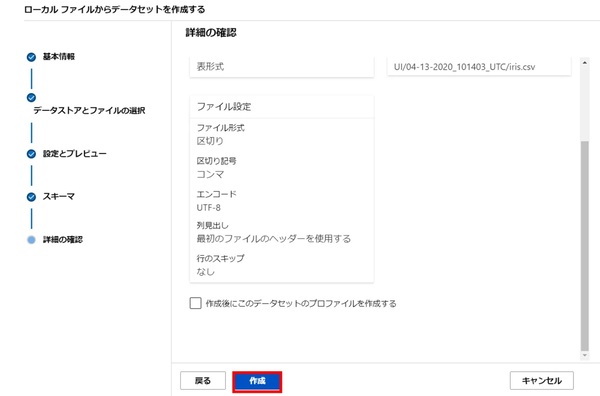
9.問題がなければ作成を選択
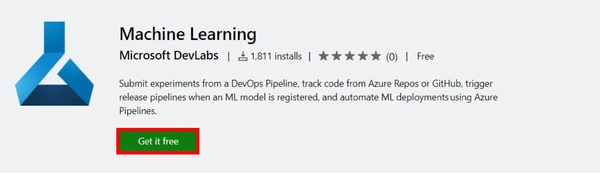
10.以下のリンクからAzure DevOpsにMachine Learningのツールをインストール
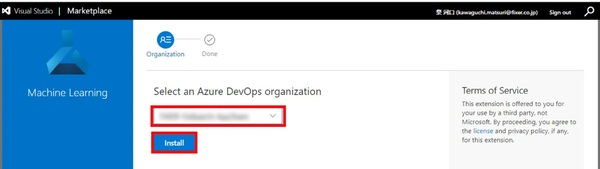
11.DevOpsのプロジェクトを選択しインストール
12.インストールが完了したらDevOpsの画面に遷移する
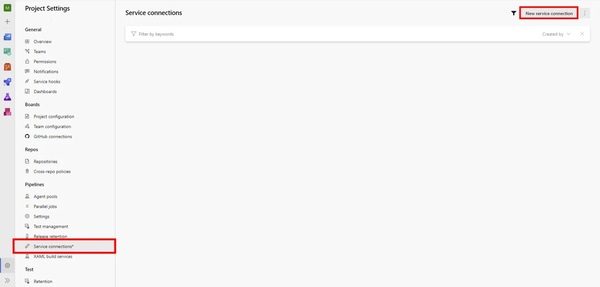
13.Project Settings -> Service connections -> New service connectionを選択
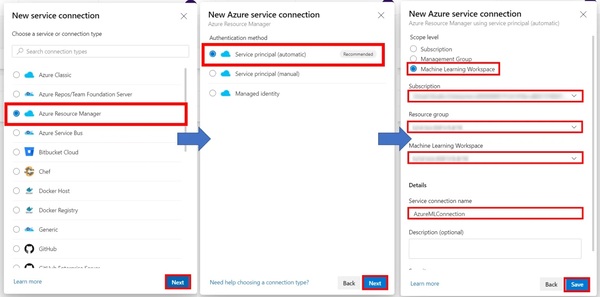
14.Azure Resource Manager -> Service principal -> Machine Learning Workspaceを選択し、各項目を入力しSave
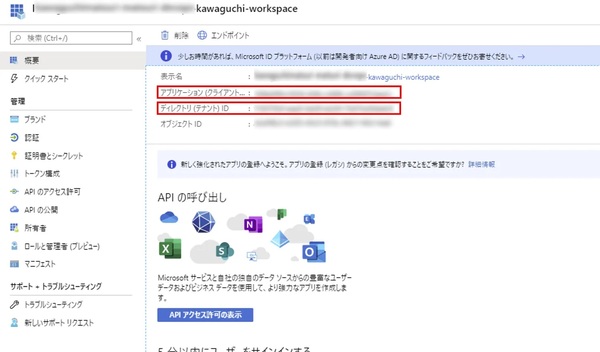
15.Azure ポータルのActive Directoryの画面を開きアプリの登録から先ほど作成したサービスコネクションを選択する
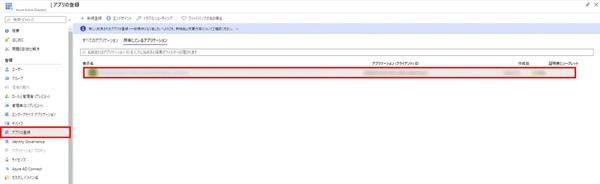
16.ここで表示されるアプリケーション ID、テナントIDをメモしておく
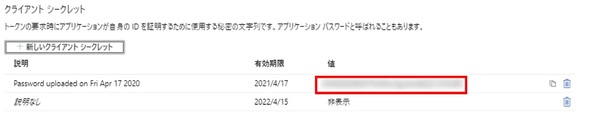
17.証明書シークレットから新しいクライアントシークレットを追加する
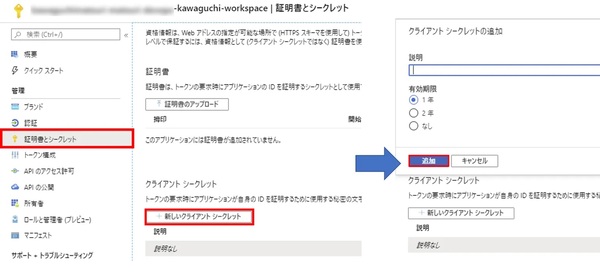
18.表示される値がパスワードになるので、先ほどメモしたアプリケーションID、テナントIDと合わせて冒頭の準備で示したServicePrincipalAuthenticationに入力する
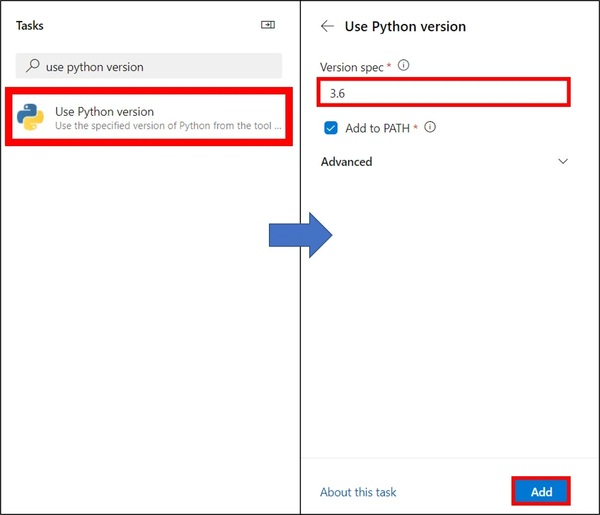
19.再びDevOpsの画面に移りビルドパイプラインを作成する。初めにUse Python versionに3.6と入力し追加する
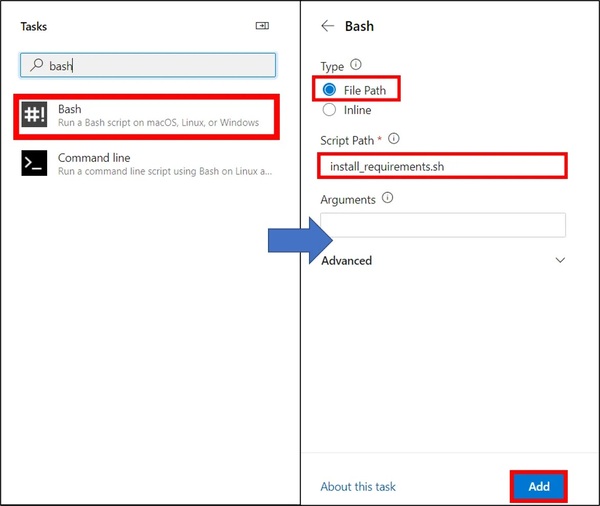
20.BashのTypeをFile Path、Script Pathをinstall_requirements.shとし追加する
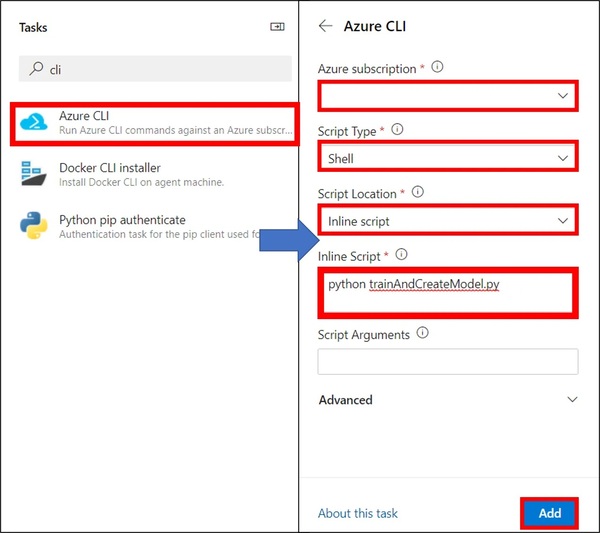
21.Azure CLIを選択し、サブスクリプションの選択、Script TypeをShell、Script LocationをInline script、Inline Scriptをpython trainAndCreateModelにし追加する
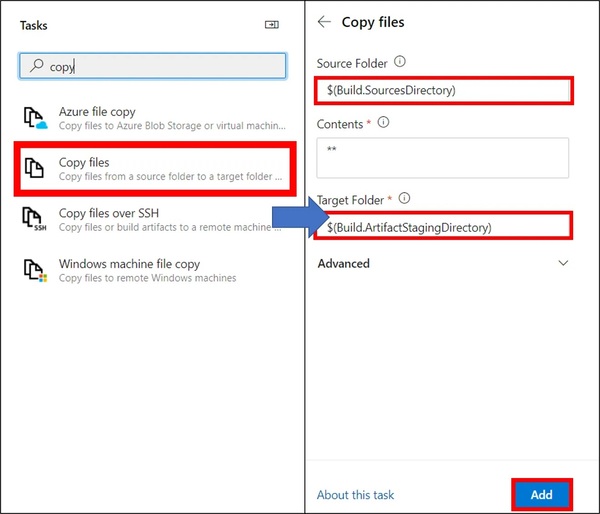
22.Copy filesを選択し、SourceFolderに$(Build.SourcesDirectory)、TargetFolderに$(Build.ArtifactStagingDirectory)を入力し追加
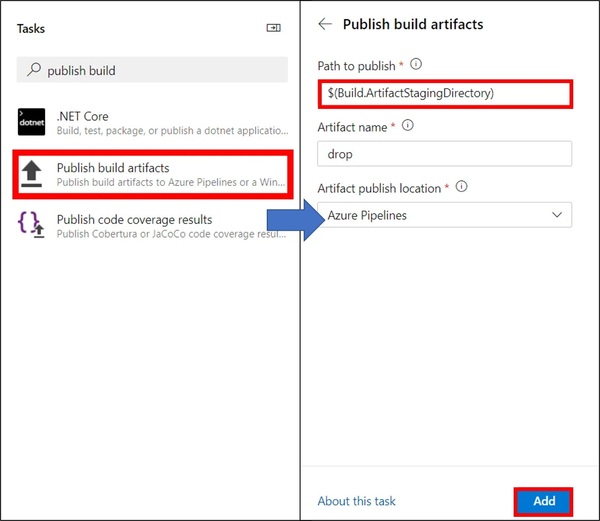
23.Publish build artifactsのPath to publishに$(Build.ArtifactStagingDirectory)を入力し追加
24.最終的にazure-pipelines.ymlが以下のようになっていれば良い
azure-pipelines.yml
# Python package
# Create and test a Python package on multiple Python versions.
# Add steps that analyze code, save the dist with the build record, publish to a PyPI-compatible index, and more:
# https://docs.microsoft.com/azure/devops/pipelines/languages/python

trigger:
- master

resources:
- repo: self

steps:
  - task: UsePythonVersion@0
    inputs:
      versionSpec: '3.6'
      addToPath: true
      architecture: 'x64'

  - task: Bash@3
    inputs:
      filePath: 'install_requirements.sh'

  - task: AzureCLI@2
    inputs:
      azureSubscription: 'azureMLConnection2'
      scriptType: 'bash'
      scriptLocation: 'inlineScript'
      inlineScript: 'python trainAndCreateModel.py'

  - task: CopyFiles@2
    inputs:
      SourceFolder: '$(Build.SourcesDirectory)'
      Contents: '**'
      TargetFolder: '$(Build.ArtifactStagingDirectory)'

  - task: PublishBuildArtifacts@1
    inputs:
      PathtoPublish: '$(Build.ArtifactStagingDirectory)'
      ArtifactName: 'drop'
      publishLocation: 'Container'
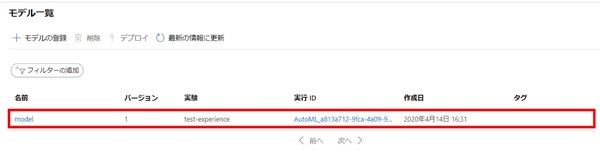
25.ビルドパイプラインをトリガーすることでモデルの再トレーニングが行なわれ、モデルが登録される。正常に終了すればAzure ML Studioの方にモデルが登録されている
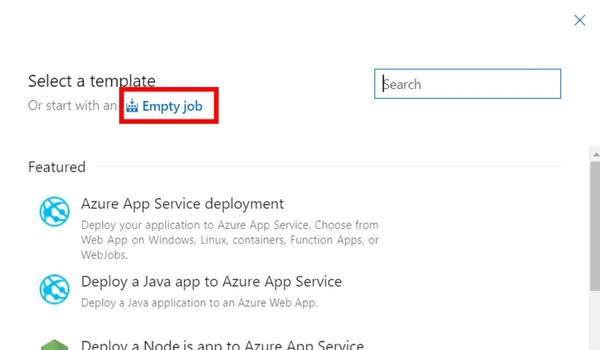
26.リリースパイプラインを作成する。テンプレートはEmpty jobを選択する
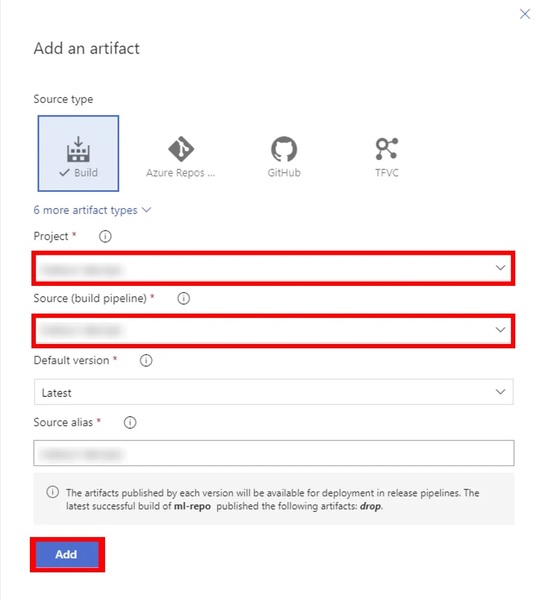
27.ArtifactsのAddからビルドパイプラインのソースを選択して追加
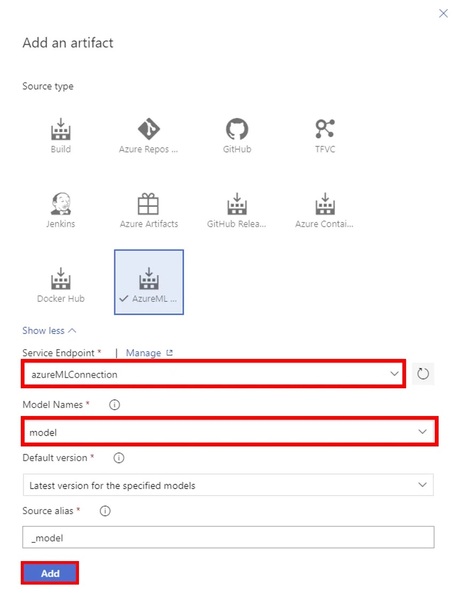
28.ArtifactsのAddからAzureML Model Artifactも追加する
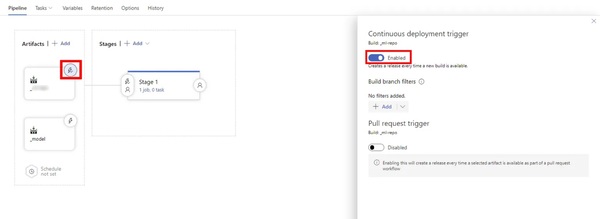
29.Artifactsのビルドパイプラインのソースのトリガーを有効化する
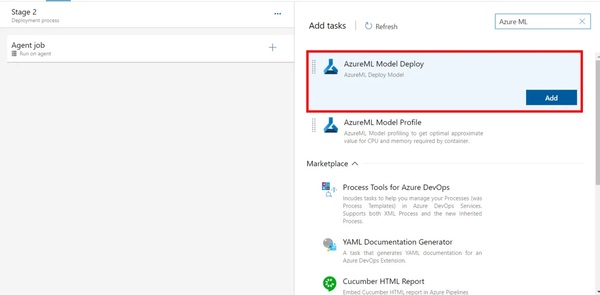
30.Stagesのjobを設定する。AzureML Model Deployを選択し追加
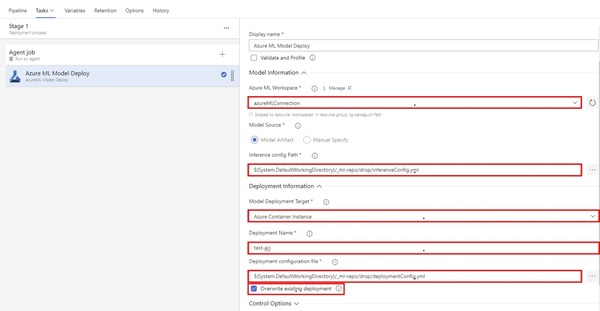
31.各項目を入力
Azure ML Workspace:サービスコネクションを選択
Inference config Path:inferenceConfig.ymlを選択
Model Deployment Target:Azure Containre Instanceを選択
Deployment Name:ACIの名前を入力
Deployment configuration file:deploymentConfig.ymlを選択
Overwrite existing deployment:同名のACIを上書きするためにチェックマークを付ける
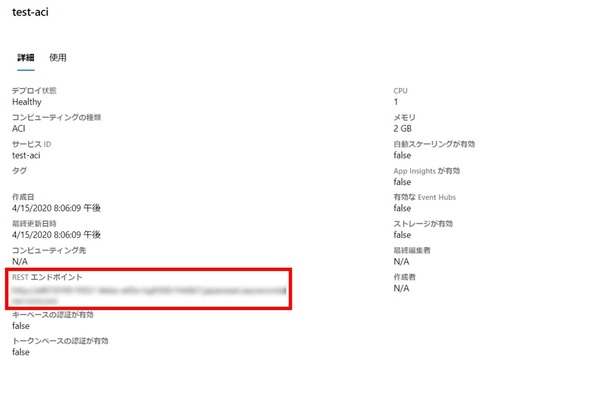
32.リリースパイプラインを走らせ正常に終了すればAzureML StudioのエンドポイントにACIが追加されている
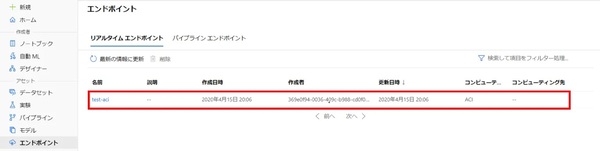
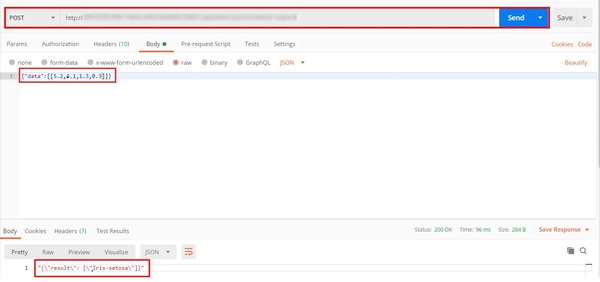
33.詳細にエンドポイントがあるためメモをする
34.正常に動作するかテストする。Postman等でメモをしたエンドポイントに対してPostすることで結果が返ってくれば成功
以上でAzureMLのAutoMLでMLOpsの構築が完了しました。ここまで読んでくれた方ありがとうございます!
河口 祭/FIXER
四日市事業所所属
本記事はアフィリエイトプログラムによる収益を得ている場合があります