モダンなプロジェクトでは、コードの再利用性を高めるため、フロントエンドとバックエンドでロジックを分けてコードを書くことが求められます。具体的な再利用の用途は、バックエンドAPIにアクセスするネイティブモバイルアプリを作る場合や、モジュール方式の大規模プラットホームにおいて新たなモジュールを開発する場合などが挙げられます。
サーバーサイドのAPIを構築するため、ExpressやRestifyといったライブラリーがよく使われます。ライブラリーを使えばRESTfulなルートを簡単に作成できますが、大量のコードを繰り返し書く必要があります。さらに、認可やミドルウェアロジック用のコードも書かなければなりません。
LoopbackやFeathersといったフレームワークを使ってAPIを作ることで、このジレンマを解決できます。
執筆時点では、GitHubのスター数もダウンロード数もFeathersよりLoopbackが多いです。LoopbackはRESTfulなCRUD(Create, Read, Update, Delete)エンドポイントを短時間で作れるすばらしいライブラリーです。しかし、Loopbackは習得が大変でドキュメントも読みにくいです。また、フレームワークの要件も厳格です。たとえばすべてのモデルは標準搭載モデルのクラスを継承しなければなりません。Loopbackでリアルタイム性を確保したい場合は、追加のコーディング作業が必要になります。
FeathersJSの導入ははるかに容易で、リアルタイム処理を標準でサポートしています。つい最近、バージョンAuk(Feathersはモジュール方式を採用しているので、数字の代わりに鳥の名前を使ってバージョン管理しています)がリリースされ、さまざまな面で大規模な変更と改良が実施されました。公式ブログの投稿によると、FeathersJSは、4番目に人気のあるリアルタイムWebフレームワークです。ドキュメントも素晴らしく、リアルタイムAPIを作るときに必要となる機能を網羅しています。
Feathersの優れた点はシンプルさです。フレームワーク全体がモジュール方式で、必要な機能だけインストールできます。Feathersはexpressをベースにservicesとhooksという新たな機能を追加した薄いラッパーです。また、WebSocketを通して簡単にデータの送受信ができます。
前提条件
以下の項目の基礎が理解できている前提でチュートリアルを始めます。
- ES6のJavaScriptコードの書き方
- Reactコンポーネントの作り方
- JavaScriptの不変性
- Reduxによるステート管理
マシンには以下の最新または準ずるバージョンをインストールしてください。
- NodeJS 6以上
- Mongodb 3.4以上
- Yarnパッケージマネージャー(オプション)
- Google Chrome
JavaScriptでデータベースAPIを書いたことがないなら、RESTful APIを作るためのチュートリアルを読むことをおすすめします。
アプリの足場作り
React、Redux、Feathers、MongoDBを使ってCRUDな連絡先管理アプリを構築します。プロジェクトの完成版はこれです。
チュートリアルでは、アプリケーションの構築方法を一から説明します。
create-react-appツールを使ってプロジェクトを開始します。
# scaffold a new react project
create-react-app react-contact-manager
cd react-contact-manager

# delete unnecessary files
rm src/logo.svg src/App.css
好きなコードエディターでindex.cssの内容をすべて削除してください。App.jsを開き、以下のコードに書き換えます。
import React, { Component } from 'react';

class App extends Component {
  render() {
    return (
      <div>
        <h1>Contact Manager</h1>
      </div>
    );
  }
}

export default App;
yarn startを実行します。コンソールのタブに警告やエラーがない状態でプロジェクトが実行できたか確認してください。問題がなければ、Ctrl+Cでサーバーを停止します。
FeathersによるAPIサーバーの構築
feathers-cliツールでバックエンドAPIを作ります。
# Install Feathers command-line tool
npm install -g feathers-cli

# Create directory for the back-end code
mkdir backend
cd backend

# Generate a feathers back-end API server
feathers generate app

? Project name | backend
? Description | contacts API server
? What folder should the source files live in? | src
? Which package manager are you using (has to be installed globally)? | Yarn
? What type of API are you making? | REST, Realtime via Socket.io

# Generate RESTful routes for Contact Model
feathers generate service

? What kind of service is it? | Mongoose
? What is the name of the service? | contact
? Which path should the service be registered on? | /contacts
? What is the database connection string? | mongodb://localhost:27017/backend


# Install email field type
yarn add mongoose-type-email

# Install the nodemon package
yarn add nodemon --devbackend/package.jsonを開き、startスクリプトを更新してnodemonを使うようにします。変更を加えたときにAPIサーバーが自動で再起動するようになります。
// backend/package.json

....
"scripts": {
    ...
    "start": "nodemon src/",
    ...
  },
...
backend/config/default.jsonを開いて、MongoDBの接続パラメーターなどの設定を編集します。このチュートリアルではページネーションを処理するフロントエンドロジックを書かないので、デフォルトのページ送り値を50に増やします。
{
  "host": "localhost",
  "port": 3030,
  "public": "../public/",
  "paginate": {
    "default": 50,
    "max": 50
  },
  "mongodb": "mongodb://localhost:27017/backend"
}backend/src/models/contact.model.jsを開き、以下のようにコードを更新してください。
// backend/src/models/contact.model.js

require('mongoose-type-email');

module.exports = function (app) {
  const mongooseClient = app.get('mongooseClient');
  const contact = new mongooseClient.Schema({
    name : {
      first: {
        type: String,
        required: [true, 'First Name is required']
      },
      last: {
        type: String,
        required: false
      }
    },
    email : {
      type: mongooseClient.SchemaTypes.Email,
      required: [true, 'Email is required']
    },
    phone : {
      type: String,
      required: [true, 'Phone is required'],
      validate: {
        validator: function(v) {
          return /^\+(?:[0-9] ?){6,14}[0-9]$/.test(v);
        },
        message: '{VALUE} is not a valid international phone number!'
      }
    },
    createdAt: { type: Date, 'default': Date.now },
    updatedAt: { type: Date, 'default': Date.now }
  });

  return mongooseClient.model('contact', contact);
};
Feathersは接続サービスの生成時にテストケースも生成します。テストをパスするためにサービス名を修正します。
// backend/test/services/contact.test.js

const assert = require('assert');
const app = require('../../src/app');

describe('\'contact\' service', () => {
  it('registered the service', () => {
    const service = app.service('contacts'); // change contact to contacts

    assert.ok(service, 'Registered the service');
  });
});ターミナルを開き、バックエンドのディレクトリでyarn testを実行します。すべてのテストをパスできるはずです。さらにyarn startを実行してバックエンドサーバーを起動します。サーバーが起動したら、「Feathers application started on localhost:3030」と出力されます。
ブラウザーを立ち上げてhttp://localhost:3030/contactsにアクセスします。以下JSON形式のレスポンスを受け取るはずです。
{"total":0,"limit":50,"skip":0,"data":[]}ここで、Postmanを使ってRESTfulなCRUDルートがすべて動作することを確認します。

Postmanを使ったことがなければ、この記事を読んでください。SENDボタンを押して、_id、createdAt、updatedAt3つの追加フィールドのレスポンスデータを受け取ります。
PostmanからPOSTリクエストするには以下のJSONデータを使用します。JSONデータをbodyに貼り付け、content-typeをapplication/jsonにセットしてください。
{
  "name": {
    "first": "Tony",
    "last": "Stark"
  },
  "phone": "+18138683770",
  "email": "tony@starkenterprises.com"
}
ユーザーインターフェイスの作成
フロントエンドで必要となる依存オブジェクトをインストールします。ページのスタイリングにsemantic-ui cssとsemantic-ui reactを利用し、ルーティングにreact-router-domを利用します。
重要:インストールはバックエンド用ディレクトリの外で実施してください。
// Install semantic-ui
yarn add semantic-ui-css semantic-ui-react

// Install react-router
yarn add react-router-dom
以下のディレクトリとファイルを追加してプロジェクト構成を更新してください。
|-- react-contact-manager
    |-- backend
    |-- node_modules
    |-- public
    |-- src
        |-- App.js
        |-- App.test.js
        |-- index.css
        |-- index.js
        |-- components
        |   |-- contact-form.js #(new)
        |   |-- contact-list.js #(new)
        |-- pages
            |-- contact-form-page.js #(new)
            |-- contact-list-page.js #(new)
仮のコードを使うことでJavaScriptファイルを素早く作ります。
contact-list.jsコンポーネントは純粋なpresentationalコンポーネントとして使うので、以下の構文を書きます。
// src/components/contact-list.js
import React from 'react';
export default function ContactList(){
return (
No contacts here
)
}
トップレベルコンテナにはpagesを使います。contact-list-page.jsのコードを変更します。
// src/pages/contact-list-page.js

import React, { Component} from 'react';
import ContactList from '../components/contact-list';

class ContactListPage extends Component {
  render() {
    return (
      <div>
        <h1>List of Contacts</h1>
        <ContactList/>
      </div>
    )
  }
}

export default ContactListPage;contact-formコンポーネントはフォームのフィールドを管理するので工夫が必要です。ひとまず、仮のコードを追加します。
// src/components/contact-form.js
import React, { Component } from 'react';

class ContactForm extends Component {
  render() {
    return (
      <div>
        <p>Form under construction</p>
      </div>
    )
  }
}

export default ContactForm;contact-form-pageにコードを追加します。
// src/pages/contact-form-page.js

import React, { Component} from 'react';
import ContactForm from '../components/contact-form';

class ContactFormPage extends Component {
  render() {
    return (
      <div>
        <ContactForm/>
      </div>
    )
  }
}

export default ContactFormPage;次に、ナビゲーションメニューを作成しアプリのルーティングを定義します。App.jsはシングルページアプリケーションの「レイアウトテンプレート」と呼ばれることが多いです。
// src/App.js

import React, { Component } from 'react';
import { NavLink, Route } from 'react-router-dom';
import { Container } from 'semantic-ui-react';
import ContactListPage from './pages/contact-list-page';
import ContactFormPage from './pages/contact-form-page';

class App extends Component {
  render() {
    return (
      <Container>
        <div className="ui two item menu">
          <NavLink className="item" activeClassName="active" exact to="/">
            Contacts List
          </NavLink>
          <NavLink className="item" activeClassName="active" exact to="/contacts/new">
            Add Contact
          </NavLink>
        </div>
        <Route exact path="/" component={ContactListPage}/>
        <Route path="/contacts/new" component={ContactFormPage}/>
        <Route path="/contacts/edit/:_id" component={ContactFormPage}/>
      </Container>
    );
  }
}

export default App;最後に、index.jsファイルを更新します。スタイリング用にsemantic-uiのCSSをインポートします。また、アプリとURLを同期した状態に保つHTML5の機能History APIを使うために、BrowserRouterをインポートします。
// src/index.js

import React from 'react';
import ReactDOM from 'react-dom';
import { BrowserRouter } from 'react-router-dom';
import App from './App';
import 'semantic-ui-css/semantic.min.css';
import './index.css';

ReactDOM.render(
  <BrowserRouter>
    <App />
  </BrowserRouter>,
  document.getElementById('root')
);ターミナルでyarn startを実行します。以下の画面が表示されます。
Reduxを使ってReactのステートを管理する
ctrl+cでサーバーを停止し、yarnパッケージマネージャーで以下のパッケージをインストールします。
yarn add redux react-redux redux-promise-middleware redux-thunk redux-devtools-extension axiosここまでがReduxをセットアップするパッケージです。このチュートリアルを読んでいる人はReduxに詳しいと前提で進めます。Redux-thunkを使うとAction Creatorを非同期関数として書けます。redux-promise-middlewareを使うと未解決の(pending)アクション、完了した(fulfilled)アクション、失敗した(rejected)アクションを自動でディスパッチして、Reduxのボイラープレートコードを削減できます。
FeathersJSはAPIと通信するための軽量なクライアントパッケージを備えていますが、ほかのクライアントパッケージも簡単に利用できます。このチュートリアルでは、HTTPクライアントAxiosを使います。
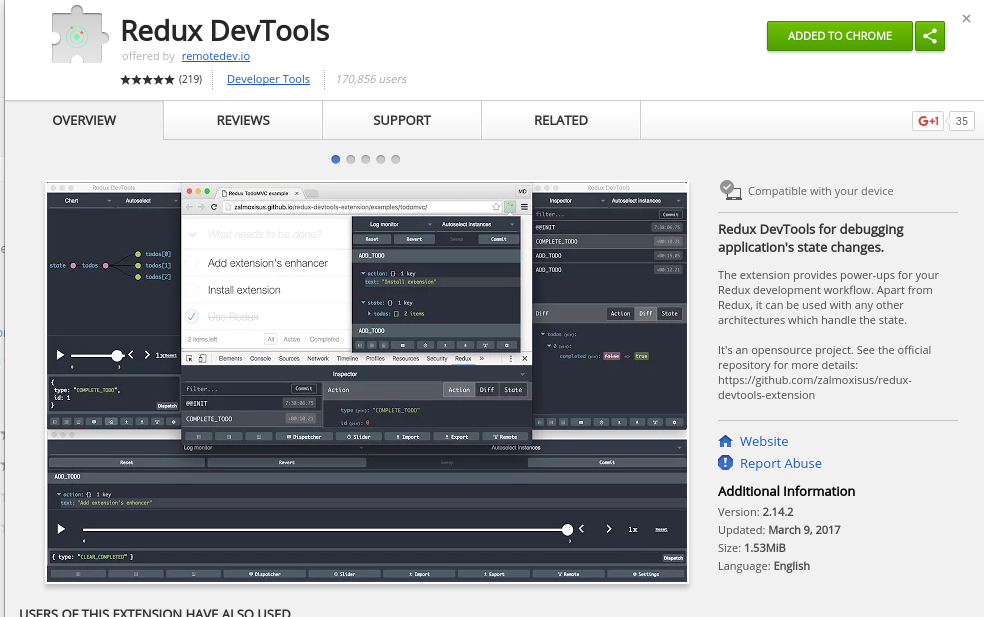
redux-devtools-extensionはディスパッチされたアクションやステートの変化を監視できる優れたツールです。Chrome拡張機能をインストールします。
続いて、Reduxのディレクトリ構造を以下のようにセットアップします。
|-- react-contact-manager
    |-- backend
    |-- node_modules
    |-- public
    |-- src
        |-- App.js
        |-- App.test.js
        |-- index.css
        |-- index.js
        |-- contact-data.js #new
        |-- store.js #new
        |-- actions #new
            |-- contact-actions.js #new
            |-- index.js #new
        |-- components
        |-- pages
        |-- reducers #new
            |-- contact-reducer.js #new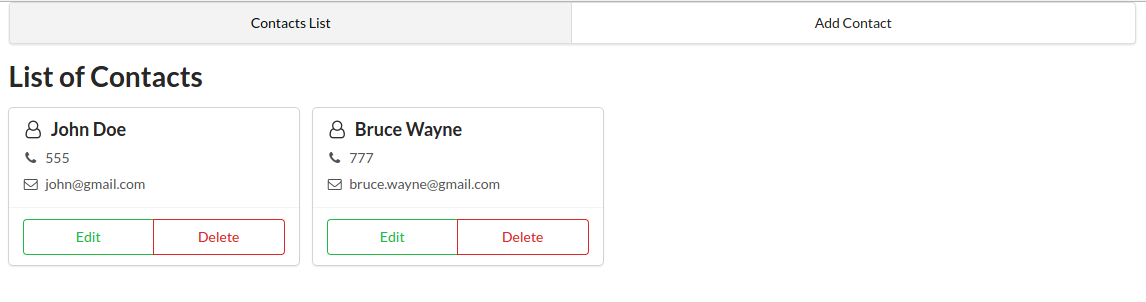
|-- index.js #newcontacts-data.jsにテストデータを追加します。
// src/contact-data.js

export const contacts = [
  {
    _id: "1",
    name: {
      first:"John",
      last:"Doe"
    },
    phone:"555",
    email:"john@gmail.com"
  },
  {
    _id: "2",
    name: {
      first:"Bruce",
      last:"Wayne"
    },
    phone:"777",
    email:"bruce.wayne@gmail.com"
  }
];contact-actions.jsに以下のコードを書いてください。データはひとまずcontacts-data.jsから取り出します。
// src/actions/contact-actions.js

import { contacts } from '../contacts-data';

export function fetchContacts(){
  return dispatch => {
    dispatch({
      type: 'FETCH_CONTACTS',
      payload: contacts
    })
  }
}contact-reducer.jsに「FETCH_CONTACT」アクションのハンドラーを書きます。連絡先データを配列「contacts」に格納します。
// src/reducers/contact-reducer.js

const defaultState = {
  contacts: []
}

export default (state=defaultState, action={}) => {
  switch (action.type) {
    case 'FETCH_CONTACTS': {
      return {
        ...state,
        contacts: action.payload
      }
    }
    default:
      return state;
  }
}reducers/index.jsでreducerをすべてまとめる(combine)ことでReduxのストアへ簡単に出力できます。
// src/reducers/index.js

import { combineReducers } from 'redux';
import ContactReducer from './contact-reducer';

const reducers = {
  contactStore: ContactReducer
}

const rootReducer = combineReducers(reducers);

export default rootReducer;store.jsでは、Reduxのストアを構築するための依存オブジェクトをインポートします。また、Chrome拡張機能を使ってReduxストアを監視するために、redux-devtools-extensionをセットアップします。
// src/store.js

import { applyMiddleware, createStore } from "redux";
import thunk from "redux-thunk";
import promise from "redux-promise-middleware";
import { composeWithDevTools } from 'redux-devtools-extension';
import rootReducer from "./reducers";

const middleware = composeWithDevTools(applyMiddleware(promise(), thunk));

export default createStore(rootReducer, middleware);index.jsを開いてrenderメソッドを更新し、ReduxのProviderクラスでストアを注入します。
// src/index.js

import React from 'react';
import ReactDOM from 'react-dom';
import { BrowserRouter } from 'react-router-dom';
import { Provider } from 'react-redux';
import App from './App';
import store from "./store"
import 'semantic-ui-css/semantic.min.css';
import './index.css';

ReactDOM.render(
  <BrowserRouter>
    <Provider store={store}>
      <App />
    </Provider>
  </BrowserRouter>,
  document.getElementById('root')
);
yarn startを実行してここまでのプログラムがすべて動作することを確認します。
次に、contact-listコンポーネントを作成したReduxストアに接続します。contact-list-pageを開き、以下のようにコードを更新してください。
// src/pages/contact-list-page

import React, { Component} from 'react';
import { connect } from 'react-redux';
import ContactList from '../components/contact-list';
import { fetchContacts } from '../actions/contact-actions';

class ContactListPage extends Component {

  componentDidMount() {
    this.props.fetchContacts();
  }

  render() {
    return (
      <div>
        <h1>List of Contacts</h1>
        <ContactList contacts={this.props.contacts}/>
      </div>
    )
  }
}

// Make contacts  array available in  props
function mapStateToProps(state) {
  return {
      contacts : state.contactStore.contacts
  }
}

export default connect(mapStateToProps, {fetchContacts})(ContactListPage);ストア内の連絡先の配列やfetchContacts()関数をthis.props変数で経由するとContactListPageコンポーネントで利用できます。これで連絡先の配列をContactListコンポーネントに渡せるようになりました。
コードを次のように更新して連絡先一覧を表示します。
// src/components/contact-list

import React from 'react';

export default function ContactList({contacts}){

  const list = () => {
    return contacts.map(contact => {
      return (
        <li key={contact._id}>{contact.name.first} {contact.name.last}</li>
      )
    })
  }

  return (
    <div>
      <ul>
        { list() }
      </ul>
    </div>
  )
}
ブラウザーに戻ると次のように表示されます。

semantic-uiのCardコンポーネントで連絡先一覧のユーザーインターフェイスをより魅力的に変えます。componentsフォルダーにcontact-card.jsファイルを新規で作成し、以下のコードを貼り付けます。
// src/components/contact-card.js

import React from 'react';
import { Card, Button, Icon } from 'semantic-ui-react'

export default function ContactCard({contact, deleteContact}) {
  return (
    <Card>
      <Card.Content>
        <Card.Header>
          <Icon name='user outline'/> {contact.name.first} {contact.name.last}
        </Card.Header>
        <Card.Description>
          <p><Icon name='phone'/> {contact.phone}</p>
          <p><Icon name='mail outline'/> {contact.email}</p>
        </Card.Description>
      </Card.Content>
      <Card.Content extra>
        <div className="ui two buttons">
          <Button basic color="green">Edit</Button>
          <Button basic color="red">Delete</Button>
        </div>
      </Card.Content>
    </Card>
  )
}

ContactCard.propTypes = {
  contact: React.PropTypes.object.isRequired
}contact-listコンポーネントを更新し、新規作成したContactCardコンポーネントを使います。
// src/components/contact-list.js

import React from 'react';
import { Card } from 'semantic-ui-react';
import ContactCard from './contact-card';

export default function ContactList({contacts}){

  const cards = () => {
    return contacts.map(contact => {
      return (
        <ContactCard key={contact._id} contact={contact}/>
      )
    })
  }

  return (
    <Card.Group>
      { cards() }
    </Card.Group>
  )
}
連絡先一覧ページが次のように表示されます。
Redux-Formによるサーバーサイドのバリデーション
ReduxストアとReactコンポーネントが適切にリンクしていると確認できました。次はデータベースに読み出しリクエストを発行し、取り出したデータを連絡先一覧ページに追加します。方法はいくつかありますが、簡単な方法を紹介します。
Axiosクライアントを編集してバックエンドサーバーに接続します。
// src/actions/index.js
import axios from "axios";

export const client = axios.create({
  baseURL: "http://localhost:3030",
  headers: {
    "Content-Type": "application/json"
  }
})
contact-actions.jsのコードを更新し、Axioクライアントを使ってGETリクエストで連絡先を読み出します。
// src/actions/contact-actions.js

import { client } from './';

const url = '/contacts';

export function fetchContacts(){
  return dispatch => {
    dispatch({
      type: 'FETCH_CONTACTS',
      payload: client.get(url)
    })
  }
}ディスパッチされるアクションとペイロードが変わったので、contact-reducer.jsも更新します。
// src/reducers/contact-reducer.js

...
    case "FETCH_CONTACTS_FULFILLED": {
      return {
        ...state,
        contacts: action.payload.data.data || action.payload.data // in case pagination is disabled
      }
    }
...
保存したら、ブラウザーを再読み込みして、バックエンドサーバーがlocalhost:3030で稼働していることを確認します。連絡先一覧ページにはデータベースから取得したデータが表示されます。
Redux-Formによる新規作成、更新リクエストの処理
新しい連絡先の追加方法を説明します。連絡先の追加にはフォームを使います。フォームの作成は一見簡単そうですが、クライアントサイドのバリデーションやエラー表示の制御を考慮すると決して油断できません。さらに、バックエンドサーバーは独自にバリデーションを実施しているため、エラー処理も必要です。
今回はフォームの機能をRedux-Formライブラリーで実装します。Classnamesという気の利いたパッケージでバリデーションエラーが発生したフィールドを強調します。
ctrl+cでサーバーを停止してから以下のパッケージをインストールします。
yarn add redux-form classnamesパッケージのインストールが終了したらサーバーを起動します。
Let’s first quickly add this css class to the index.css file to style the form errors:
以下のCSSクラスをindex.cssファイルに追加してフォームエラーをスタイリングします。
/* src/index.css */

.error {
  color: #9f3a38;
}redux-formのreducerをreducers/index.jsのcombineReducers()関数に追加します。
// src/reducers/index.js

...
import { reducer as formReducer } from 'redux-form';

const reducers = {
  contactStore: ContactReducer,
  form: formReducer
}
....contact-form.jsに以下のコードを書いてフォームのユーザーインターフェイスを作ります。
// src/components/contact-form

import React, { Component } from 'react';
import { Form, Grid, Button } from 'semantic-ui-react';
import { Field, reduxForm } from 'redux-form';
import classnames from 'classnames';

class ContactForm extends Component {

  renderField = ({ input, label, type, meta: { touched, error } }) => (
    <Form.Field className={classnames({error:touched && error})}>
      <label>{label}</label>
      <input {...input} placeholder={label} type={type}/>
      {touched && error && <span className="error">{error.message}</span>}
    </Form.Field>
  )

  render() {
    const { handleSubmit, pristine, submitting, loading } = this.props;

    return (
      <Grid centered columns={2}>
        <Grid.Column>
          <h1 style={{marginTop:"1em"}}>Add New Contact</h1>
          <Form onSubmit={handleSubmit} loading={loading}>
            <Form.Group widths='equal'>
              <Field name="name.first" type="text" component={this.renderField} label="First Name"/>
              <Field name="name.last" type="text" component={this.renderField} label="Last Name"/>
            </Form.Group>
            <Field name="phone" type="text" component={this.renderField} label="Phone"/>
            <Field name="email" type="text" component={this.renderField} label="Email"/>
            <Button primary type='submit' disabled={pristine || submitting}>Save</Button>
          </Form>
        </Grid.Column>
      </Grid>
    )
  }
}

export default reduxForm({form: 'contact'})(ContactForm);処理内容が多いので時間をかけてコードを確認してください。redux-formの仕組みはリファレンスガイドで理解できます。また、コードの中のsemantic-ui-react要素を理解するにはドキュメントに目を通し、elementsの各項目を参照します。
新しい連絡先をデータベースに追加するためのアクションを定義します。最初のアクションはReduxフォームに新たなcontactオブジェクトを渡します。次のアクションはcontactデータをAPIサーバーに送ります。
contact-actions.jsの最後に以下のコードを追加します。
// src/actions/contact-actions.js

...

export function newContact() {
  return dispatch => {
    dispatch({
      type: 'NEW_CONTACT'
    })
  }
}

export function saveContact(contact) {
  return dispatch => {
    return dispatch({
      type: 'SAVE_CONTACT',
      payload: client.post(url, contact)
    })
  }
}contact-reducerで「NEW_CONTACT」、 「SAVE_CONTACT_PENDING」、「SAVE_CONTACT_FULFILLED」、「SAVE_CONTACT_REJECTED」各アクションを処理します。以下の変数を宣言します。
- contact:空のオブジェクトを初期化するための変数
- loading:進捗状況を用いてユーザーインターフェイスを更新するための変数
- errors:不具合発生時のためにサーバーのバリデーションエラーを保存するための変数
contact-reducerのswitch文に以下のコードを追加してください。
// src/reducers/contact-reducer.js

...
const defaultState = {
  contacts: [],
  contact: {name:{}},
  loading: false,
  errors: {}
}
...
case 'NEW_CONTACT': {
      return {
        ...state,
        contact: {name:{}}
      }
    }

    case 'SAVE_CONTACT_PENDING': {
      return {
        ...state,
        loading: true
      }
    }

    case 'SAVE_CONTACT_FULFILLED': {
      return {
        ...state,
        contacts: [...state.contacts, action.payload.data],
        errors: {},
        loading: false
      }
    }

    case 'SAVE_CONTACT_REJECTED': {
      const data = action.payload.response.data;
      // convert feathers error formatting to match client-side error formatting
      const { "name.first":first, "name.last":last, phone, email } = data.errors;
      const errors = { global: data.message, name: { first,last }, phone, email };
      return {
        ...state,
        errors: errors,
        loading: false
      }
    }
  ...
contact-form-page.jsを開き以下のようにコードを更新してください
  ```jsx
  // src/pages/contact-form-page

import React, { Component} from 'react';
import { Redirect } from 'react-router';
import { SubmissionError } from 'redux-form';
import { connect } from 'react-redux';
import { newContact, saveContact } from '../actions/contact-actions';
import ContactForm from '../components/contact-form';


class ContactFormPage extends Component {

  state = {
    redirect: false
  }

  componentDidMount() {
    this.props.newContact();
  }

  submit = (contact) => {
    return this.props.saveContact(contact)
      .then(response => this.setState({ redirect:true }))
      .catch(err => {
         throw new SubmissionError(this.props.errors)
       })
  }

  render() {
    return (
      <div>
        {
          this.state.redirect ?
          <Redirect to="/" /> :
          <ContactForm contact={this.props.contact} loading={this.props.loading} onSubmit={this.submit} />
        }
      </div>
    )
  }
}

function mapStateToProps(state) {
  return {
    contact: state.contactStore.contact,
    errors: state.contactStore.errors
  }
}

export default connect(mapStateToProps, {newContact, saveContact})(ContactFormPage);
ブラウザーに戻って、わざと不完全なフォームを保存します。
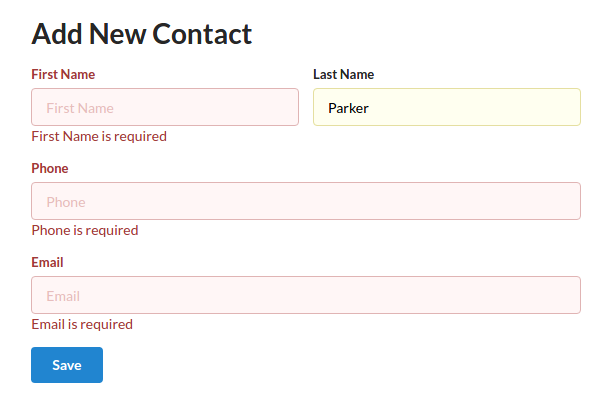
サーバーサイドのバリデーションによって不完全な連絡先の保存を防止します。念のため補足すると、SubmissionErrorクラスでthis.props.errorsをフォームに渡しています。
フォームの入力を完了します。保存ボタンをクリックすると連絡先一覧ページに遷移します。
Redux Formによるクライアントサイドのバリデーション
クライアントサイドのバリデーションの実装方法を解説します。contact-formを開いて次のコードをContactFormクラスの外に貼り付け、デフォルトのexportを以下のように更新します。
// src/components/contact-form.js
...
const validate = (values) => {
const errors = {name:{}};
if(!values.name || !values.name.first) {
errors.name.first = {
message: 'You need to provide First Name'
}
}
if(!values.phone) {
errors.phone = {
message: 'You need to provide a Phone number'
}
} else if(!/^\+(?:[0-9] ?){6,14}[0-9]$/.test(values.phone)) {
errors.phone = {
message: 'Phone number must be in International format'
}
}
if(!values.email) {
errors.email = {
message: 'You need to provide an Email address'
}
} else if (!/^[A-Z0-9._%+-]+@[A-Z0-9.-]+\.[A-Z]{2,4}$/i.test(values.email)) {
errors.email = {
message: 'Invalid email address'
}
}
return errors;
}
...
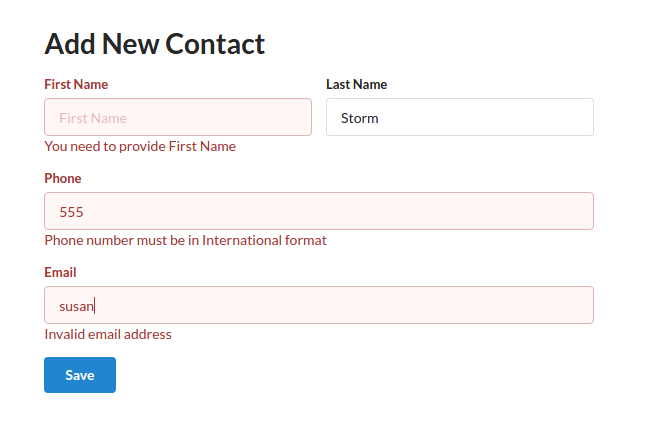
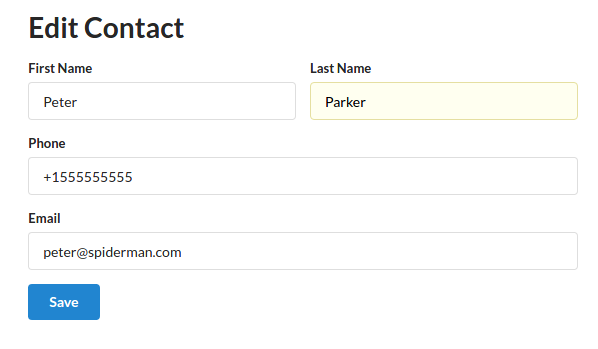
export default reduxForm({form: 'contact', validate})(ContactForm);ファイルを保存したら、ブラウザーに戻って無効なデータを入力します。クライアントサイドのバリデーションがサーバーへのデータ送信をブロックします。
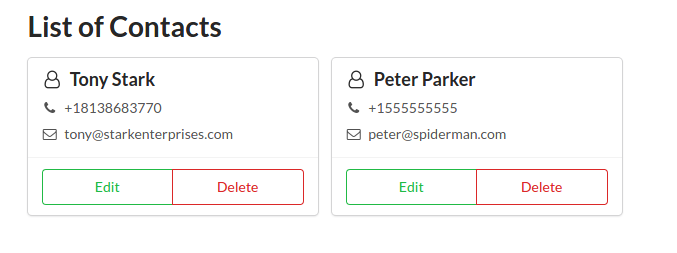
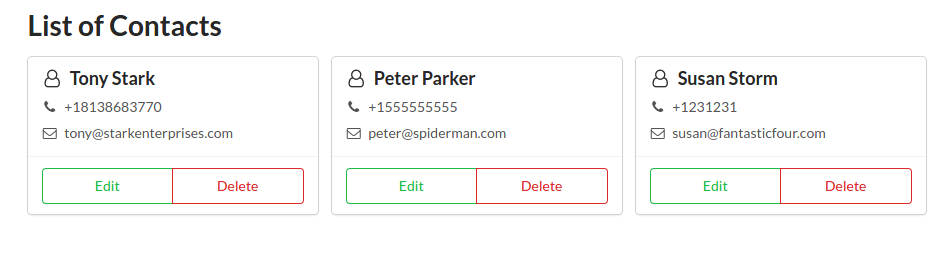
次は有効なデータを入力してください。この時点で、新しい連絡先が少なくとも3つになります。
連絡先の更新を実装する
新しい連絡先の追加の次は既存の連絡先を更新する方法を解説します。contact-actions.jsファイルに2つのアクションを定義します。連絡先を1つ取り出すアクションと、その連絡先を更新するアクションです。
// src/actions/contact-actions.js

...
export function fetchContact(_id) {
  return dispatch => {
    return dispatch({
      type: 'FETCH_CONTACT',
      payload: client.get(`${url}/${_id}`)
    })
  }
}

export function updateContact(contact) {
  return dispatch => {
    return dispatch({
      type: 'UPDATE_CONTACT',
      payload: client.put(`${url}/${contact._id}`, contact)
    })
  }
}contact-reducerに以下のcase文を追加し、データベースからの連絡先読み出し時と連絡先更新時にステートを更新します。
// src/reducers/contact-reducer.js

...
case 'FETCH_CONTACT_PENDING': {
  return {
    ...state,
    loading: true,
    contact: {name:{}}
  }
}

case 'FETCH_CONTACT_FULFILLED': {
  return {
    ...state,
    contact: action.payload.data,
    errors: {},
    loading: false
  }
}

case 'UPDATE_CONTACT_PENDING': {
  return {
    ...state,
    loading: true
  }
}

case 'UPDATE_CONTACT_FULFILLED': {
  const contact = action.payload.data;
  return {
    ...state,
    contacts: state.contacts.map(item => item._id === contact._id ? contact : item),
    errors: {},
    loading: false
  }
}

case 'UPDATE_CONTACT_REJECTED': {
  const data = action.payload.response.data;
  const { "name.first":first, "name.last":last, phone, email } = data.errors;
  const errors = { global: data.message, name: { first,last }, phone, email };
  return {
    ...state,
    errors: errors,
    loading: false
  }
}
...新規で作成した「取り出しアクション」と「保存アクション」をcontact-form-page.jsに渡します。連絡先を作成するシナリオ、更新するシナリオの両方を処理するためにcomponentDidMount()とsubmit()のロジックを変更します。それぞれのコードを以下のように更新します。
// src/pages/contact-form-page.js

....
import { newContact, saveContact, fetchContact, updateContact } from '../actions/contact-actions';

...

componentDidMount = () => {
  const { _id } = this.props.match.params;
  if(_id){
    this.props.fetchContact(_id)
  } else {
    this.props.newContact();
  }
}

submit = (contact) => {
  if(!contact._id) {
    return this.props.saveContact(contact)
      .then(response => this.setState({ redirect:true }))
      .catch(err => {
         throw new SubmissionError(this.props.errors)
       })
  } else {
    return this.props.updateContact(contact)
      .then(response => this.setState({ redirect:true }))
      .catch(err => {
         throw new SubmissionError(this.props.errors)
       })
  }
}

...

export default connect(
  mapStateToProps, {newContact, saveContact, fetchContact, updateContact})(ContactFormPage);
Redux Formの初期化(initialize)関数を使って、contact-formがfetchContact()アクションから非同期でデータを受け取れるようにします。初期化関数はprops経由で利用できます。また、連絡先を編集しているのか追加しているのか分かるようにページタイトルを更新するスクリプトを書きます。
// src/components/contact-form.js

...
componentWillReceiveProps = (nextProps) => { // Receive Contact data Asynchronously
  const { contact } = nextProps;
  if(contact._id !== this.props.contact._id) { // Initialize form only once
    this.props.initialize(contact)
  }
}
...

    <h1 style={{marginTop:"1em"}}>{this.props.contact._id ? 'Edit Contact' : 'Add New Contact'}</h1>

...contact-card.jsのEditボタンを、ユーザーをフォームへ遷移させるリンクに変えます。
// src/components/contact-card.js

...
import { Link } from 'react-router-dom';

...
      <div className="ui two buttons">
        <Link to={`/contacts/edit/${contact._id}`} className="ui basic button green">Edit</Link>
        <Button basic color="red">Delete</Button>
      </div>
...
連絡先一覧ページを再読み込みし、連絡先を1つ選んでEditボタンを押します。
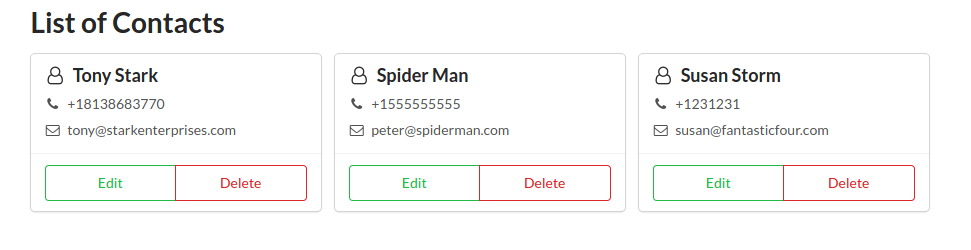
変更を加えて保存します。
以上でユーザーが新しい連絡先を追加したり既存の連絡先を更新したりできるようになりました。
削除リクエストの実装
CRUDの最後の操作である削除を解説します。削除はほかの操作よりもはるかに簡単です。contact-actions.jsファイルに以下を追加します。
// src/actions/contact-actions.js

...
export function deleteContact(_id) {
  return dispatch => {
    return dispatch({
      type: 'DELETE_CONTACT',
      payload: client.delete(`${url}/${_id}`)
    })
  }
}パターンを掴めたでしょうか。では、contact-reducer.jsにdeleteContact()アクションのcase文を定義します。
// src/reducers/contact-reducer.js

...
case 'DELETE_CONTACT_FULFILLED': {
    const _id = action.payload.data._id;
    return {
      ...state,
      contacts: state.contacts.filter(item => item._id !== _id)
    }
  }
...deleteContact()アクションをcontact-list-page.jsにインポートして、ContactListコンポーネントに渡します。
// src/pages/contact-list-page.js

...
import { fetchContacts, deleteContact } from '../actions/contact-actions';
...

<ContactList contacts={this.props.contacts} deleteContact={this.props.deleteContact}/>

...

export default connect(mapStateToProps, {fetchContacts, deleteContact})(ContactListPage);ContactListコンポーネントで、eleteContact()アクションをContactCardコンポーネントに渡します。
// src/components/contact-list.js

...
export default function ContactList({contacts, deleteContact}){ // replace this line

const cards = () => {
  return contacts.map(contact => {
    return (
      <ContactCard
      key={contact._id}
      contact={contact}
      deleteContact={deleteContact} /> // and this one
    )
  })
}
...最後に、ContactCardのDeleteボタンを更新し、onClick属性でdeleteContact()アクションを実行します。
// src/components/contact-card.js

...
<Button basic color="red" onClick={() => deleteContact(contact._id)} >Delete</Button>
...
ブラウザーを再読み込みし、連絡先をいくつか削除してください。期待通りに動作するはずです。
最後に
チュートリアルを通して、JavaScriptでCRUDなWebアプリを作るための基礎を身につけられたはずです。たった1つのモデルを管理するためにかなりたくさんのコードを書いたと思うかもしれません。MVCフレームワークを使っていれば、作業量はもっと少なくなったでしょう。しかし、そうしたフレームワークにはコードの規模が大きくなるにつれて管理が困難になるという問題があります。
ReduxをはじめFluxに基づいたフレームワークでプロジェクトを作れば、大規模で複雑なものでも管理が簡単です。Reduxの冗長なコードを好きになれないなら、Mobx使う選択肢もあります。
少なくともFeathersJSについて良い印象を持ってくれたなら幸いです。わずかなコマンドとコーディングだけで、簡単にデータベースAPIを作成できます。今回はFeathersJSができることのほんの一部を紹介しただけですが、それでもFeathersJSがAPIを作るための堅牢なソリューションであると同意してもらえるはずです。
本記事はMarshall Thompson、Sebastian Seitzが査読を担当しています。最高のコンテンツに仕上げるために尽力してくれたSitePointの査読担当者のみなさんに感謝します。
(原文:Build a CRUD App Using React, Redux and FeathersJS)
[翻訳:薮田佳佑/編集:Livit]
本記事はアフィリエイトプログラムによる収益を得ている場合があります