
この記事では、ユーザーがアプリから商品やサービスの購入を、Stripeでできるようにする方法を紹介します。Stripeはオンラインで商品、注文、支払いを管理するもっともシンプルな手段です。
記事に掲載したコードはGithubから入手できます。
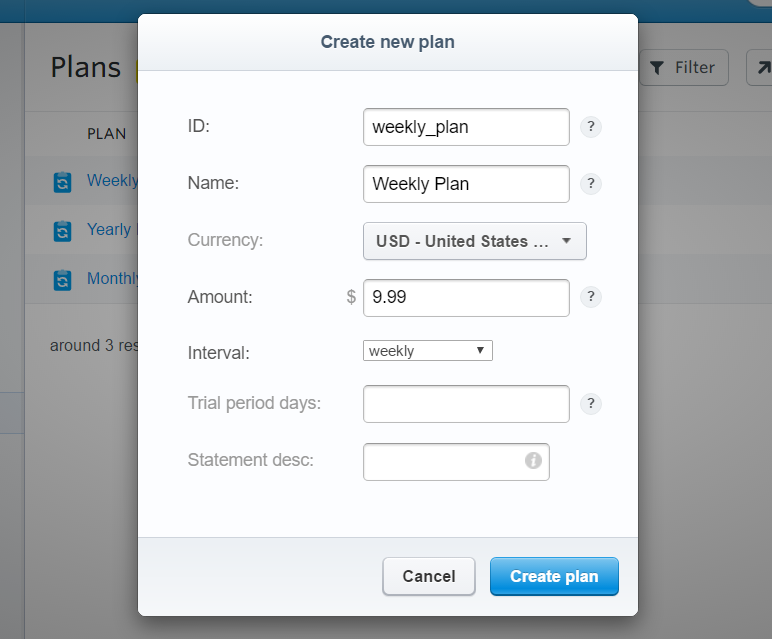
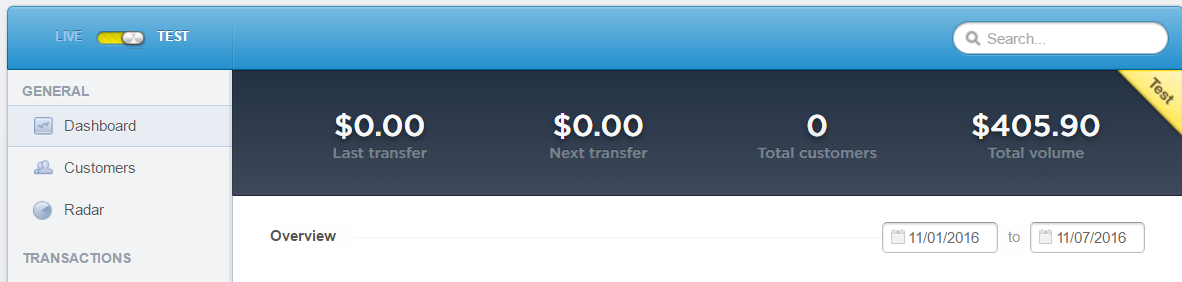
Stripeのダッシュボード
記事では、最終的にユーザーが有料プランを購入できるようにします。始めに、シンプルなプランを作成します。
Stripeにログインしてください(アカウントを持っていなければ取得してください)。ダッシュボードからプランを作成する前に、テストモードであることを確かめてください。

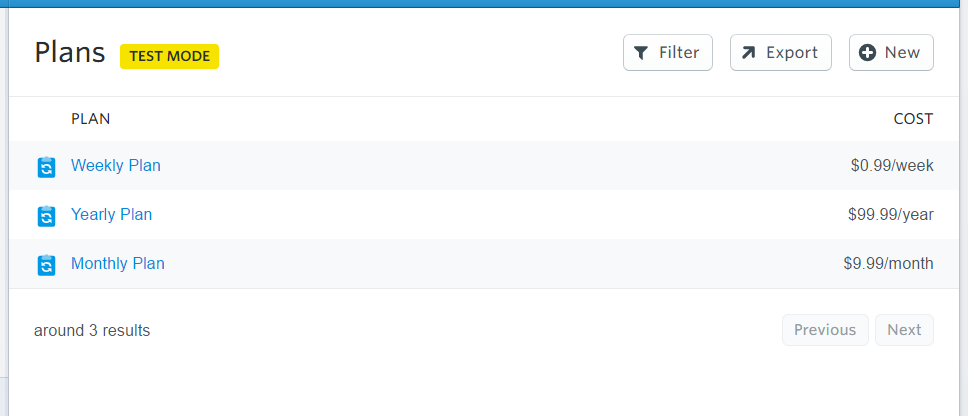
次のように、Weekly、Monthly、Yearlyの3つの購読プランを作成します。プランを区別できるように、プランの情報と値段を設定します。
Androidプロジェクトを作成する
Android Studioに新たなプロジェクトを作成し、build.gradleファイルのdependenciesに次の行を追加します。
compile ('com.stripe:stripe-android:1.0.4@aar'){
    transitive=true
}
このアプリはインターネットへの接続が必要なので、AndroidManifest.xmlファイルに次のuser-permissionを追加します。
<uses-permission android:name="android.permission.INTERNET" />
商品を読み込む
Stripeダッシュボードからプランをダウンロードするには、最初にAPI Keyでアプリを接続します。
全部で4つのkeyがありますが、ここではtest keyだけを使います。MainActivity.classを開いて、次の宣言文をonCreate()メソッドの前に追加します。
Stripe stripe;
ArrayList<Plan> planArrayList;
PlanCollection planCollection;
RecyclerView recyclerView;
ItemsAdapter adapter;
続いて、onCreate()の中に次のようにStripeインスタンスを作成します。
com.stripe.Stripe.apiKey = "sk_test_[Your_SK_TEST_KEY_HERE]";
        stripe = new Stripe();
        try {
            stripe.setDefaultPublishableKey("pk_test_[Your_PK_TEST_KEY_HERE]");
        } catch (AuthenticationException e) {
            e.printStackTrace();
        }
    planArrayList = new ArrayList<>();
Mainクラスの中にAysncTaskを作り、Stripeからデータをダウンロードします。AysncTaskは新しいスレッドで実行して、メインスレッドがネットワーク接続イベントによって中断されないようにします。
次のクラスをMain Activityコードに追加します。
public class Async extends AsyncTask<Void,String,ArrayList<Plan>> {

        @Override
        protected ArrayList<Plan> doInBackground(Void... params) {

            final Map<String, Object> productParams = new HashMap<String, Object>();
            productParams.put("limit", 3);

            new Thread(new Runnable() {
                @Override
                public void run() {
                    try {
                        planCollection = Plan.list(productParams);
                        planArrayList.addAll(planCollection.getData());
                    } catch (AuthenticationException e) {
                        e.printStackTrace();
                    } catch (InvalidRequestException e) {
                        e.printStackTrace();
                    } catch (APIConnectionException e) {
                        e.printStackTrace();
                    } catch (CardException e) {
                        e.printStackTrace();
                    } catch (APIException e) {
                        e.printStackTrace();
                    }
                }
            }).start();
            return planArrayList;
        }

        @Override
        protected void onPostExecute(final ArrayList<Plan> plan) {
            super.onPostExecute(plan);
            new Handler().postDelayed(new Runnable() {
                @Override
                public void run() {
                    showRcv(plan);
                }
            },3000);
        }
    }
StripeのSDKには間接的に呼び出される独自のネットワークコールメソッドがあります。上のクラスでは、
planCollection = Plan.list(productParams);
がネットワークコールで、プランのリストを取得するリクエストをサーバーに送信しています。
コードではStripe APIからすべてのプランを取得し、planArrayListというArrayListに追加します。これらの命令はバックグランドで実行しており、doInBackground関数はArrayListを返します。2番目の関数onPostExecute(final ArrayList<Plan> plan)は、doInBackground関数のあとに呼び出します。
2番目の関数onPostExecute(final ArrayList<Plan> plan)には、はじめのメソッドから返されたArrayListをそのままパラメーターとして渡します。はじめのメソッドを終えるまで何秒かかるか分からないため、確実に完了するだけの時間が経過したら2番目のメソッドを実行するのが賢明です。例ではその時間を3000msにしました。
設定した時間が経過したら、2番目の関数はshowRcv(plan)という別の関数を呼び出します。コードは次のようになります。
public void showRcv(ArrayList<Plan> plans){
        adapter = new ItemsAdapter(this,plans);
        recyclerView = (RecyclerView)findViewById(R.id.recyclerView);
        recyclerView.setLayoutManager(new LinearLayoutManager(this));
        recyclerView.setAdapter(adapter);
    }
ここまではアプリケーション内にプランを並べているだけです。記事ではRecyclerView AdapterやViewHoldercodeは取り上げませんがGithubで入手できます。
プランは次のように表示されます。
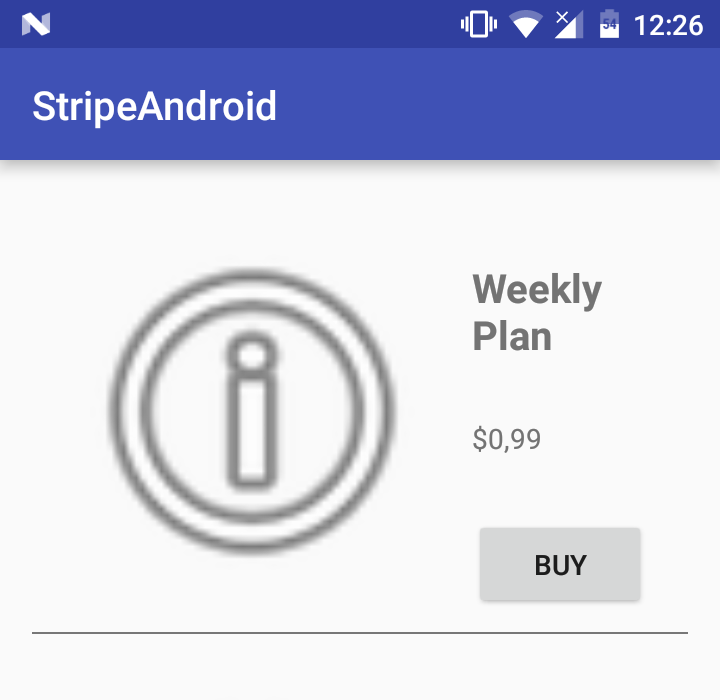
画面に表示されるアイテムの右には、プランごとにBuyボタンがあります。
それぞれのBuyボタンにはOnClickListenerが設定されています。
holder.buy.setOnClickListener(new View.OnClickListener() {
            @Override
            public void onClick(View v) {
                Intent buyIntent = new Intent(activity,PayActivity.class);
                buyIntent.putExtra("plan_id",""+planArrayList.get(i).getId());
                buyIntent.putExtra("plan_price",planArrayList.get(i).getAmount());
                buyIntent.putExtra("plan_name",""+planArrayList.get(i).getName());
                activity.startActivity(buyIntent);
            }
        });
ボタンがクリックされると、plan_priceとplan_nameの2つの変数がIntent Extrasに渡されます。これはchargeを作成するための大切なものです。
支払いを受け付ける
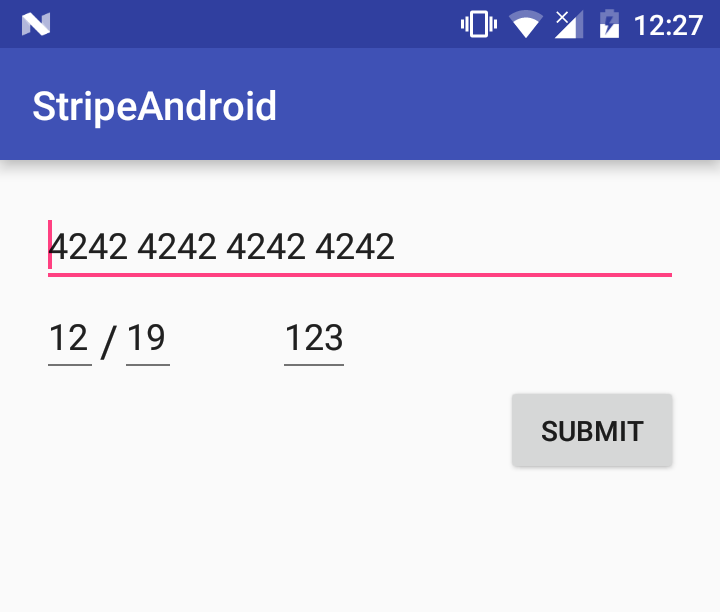
パッケージディレクトリを右クリックして、空のActivityを作成します。プランのどれかが購入されるとこのActivityが実行されます。
xmlコードは次のとおりです。
<?xml version="1.0" encoding="utf-8"?>
<RelativeLayout
    xmlns:android="http://schemas.android.com/apk/res/android"
    xmlns:tools="http://schemas.android.com/tools"
    android:id="@+id/activity_main"
    android:layout_width="match_parent"
    android:layout_height="match_parent"
    tools:context="com.example.theodhor.stripeandroid.PayActivity">

    <RelativeLayout
        android:layout_width="match_parent"
        android:layout_height="wrap_content"
        android:layout_margin="20dp">


        <EditText
            android:layout_width="wrap_content"
            android:layout_height="wrap_content"
            android:id="@+id/cardNumber"
            android:layout_alignParentTop="true"
            android:layout_alignParentLeft="true"
            android:layout_alignParentStart="true"
            android:layout_alignParentRight="true"
            android:layout_alignParentEnd="true"
            android:text="4242 4242 4242 4242" />

        <EditText
            android:layout_width="30dp"
            android:layout_height="wrap_content"
            android:inputType="number"
            android:ems="10"
            android:id="@+id/month"
            android:layout_below="@+id/cardNumber"
            android:layout_alignParentLeft="true"
            android:layout_alignParentStart="true"
            android:text="12" />

        <EditText
            android:layout_width="30dp"
            android:layout_height="wrap_content"
            android:inputType="number"
            android:ems="10"
            android:id="@+id/year"
            android:text="19"
            android:layout_below="@+id/cardNumber"
            android:layout_toRightOf="@+id/textView"
            android:layout_toEndOf="@+id/textView" />

        <TextView
            android:layout_width="wrap_content"
            android:layout_height="36dp"
            android:textAppearance="?android:attr/textAppearanceLarge"
            android:text="/"
            android:id="@+id/textView"
            android:layout_alignBottom="@+id/month"
            android:layout_toRightOf="@+id/month"
            android:layout_toEndOf="@+id/month" />

        <EditText
            android:layout_width="wrap_content"
            android:layout_height="wrap_content"
            android:id="@+id/cvc"
            android:text="123"
            android:layout_below="@+id/cardNumber"
            android:layout_toRightOf="@+id/year"
            android:layout_toEndOf="@+id/year"
            android:layout_marginLeft="49dp"
            android:layout_marginStart="49dp" />

        <Button
            android:layout_width="wrap_content"
            android:layout_height="wrap_content"
            android:text="Submit"
            android:id="@+id/submitButton"
            android:layout_below="@+id/cvc"
            android:layout_alignParentRight="true"
            android:layout_alignParentEnd="true"
            android:onClick="submitCard" />

    </RelativeLayout>

</RelativeLayout>
支払いの動き
このクラスにいくつかの変数を宣言します。
Stripe stripe;
Integer amount;
String name;
Card card;
Token tok;
onCreate()メソッドでBuyボタンから送信されるextrasを受け取ります。あとでchargeを作成するときにプランのprice amountとnameを使用します。
Bundle extras = getIntent().getExtras();
amount = extras.getInt("plan_price");
name = extras.getString("plan_name");
Publishable Test KeyでStripeインスタンスを作成します。
try {
        stripe = new Stripe("[YOUR_PK_TEST_KEY_HERE]");
                } catch (AuthenticationException e) {
        e.printStackTrace();
}
chargeを作成する前に、カード情報を認証します。
このsumbitCard(View view)メソッドは有効なカード情報が入力されたことを確認し、有効ならカードのtokenを作成しchargeに使います。
public void submitCard(View view) {
        // TODO: replace with your own test key
        TextView cardNumberField = (TextView) findViewById(R.id.cardNumber);
        TextView monthField = (TextView) findViewById(R.id.month);
        TextView yearField = (TextView) findViewById(R.id.year);
        TextView cvcField = (TextView) findViewById(R.id.cvc);

        card = new Card(
                cardNumberField.getText().toString(),
                Integer.valueOf(monthField.getText().toString()),
                Integer.valueOf(yearField.getText().toString()),
                cvcField.getText().toString()
        );

        card.setCurrency("usd");
        card.setName("Theodhor Pandeli");
        card.setAddressZip("1000");
        /*
        card.setNumber("4242424242424242");
        card.setExpMonth(12);
        card.setExpYear(19);
        card.setCVC("123");
        */


        stripe.createToken(card, "[YOUR_PK_TEST_KEY_HERE]", new TokenCallback() {
            public void onSuccess(Token token) {
                // TODO: Send Token information to your backend to initiate a charge
                Toast.makeText(getApplicationContext(), "Token created: " + token.getId(), Toast.LENGTH_LONG).show();
                tok = token;
                new StripeCharge().doInBackground();
            }

            public void onError(Exception error) {
                Log.d("Stripe", error.getLocalizedMessage());
            }
        });
テストに使えるデフォルトの有効なカード情報を次に示します。
次のように値を設定できます。
card.setNumber("4242424242424242");
card.setExpMonth(12);
card.setExpYear(19);
card.setCVC("123");
カード認証後にtokenが作られ、Chargeが作成されます。Chargeもネットワークコールなので、メインスレッドでは実行しません。
PayActivityクラスにStripeChargeという新しいAsyncTaskを作成します。
public class StripeCharge extends com.stripe.android.compat.AsyncTask {

        @Override
        protected String doInBackground(Object... params) {

            new Thread() {
                @Override
                public void run() {
                    try {
                        Map<String, Object> chargeParams = new HashMap<String, Object>();
                        chargeParams.put("amount", amount); // Amount in cents
                        chargeParams.put("currency", "usd");
                        chargeParams.put("card", tok.getId());
                        chargeParams.put("description", name);

                        Charge charge = Charge.create(chargeParams);
                        charge.capture();
                    } catch (CardException e) {
                        // The card has been declined
                        e.printStackTrace();
                    } catch (APIException e) {
                        e.printStackTrace();
                    } catch (InvalidRequestException e) {
                        e.printStackTrace();
                    } catch (APIConnectionException e) {
                        e.printStackTrace();
                    } catch (AuthenticationException e) {
                        e.printStackTrace();
                    }
                }
            }.start();
            return "Done";
        }

        @Override
        protected void onPostExecute(Object o) {
            super.onPostExecute(o);
            Toast.makeText(PayActivity.this, "Payment done!", Toast.LENGTH_SHORT).show();
        }
    }
amount、currencyとtoken idで識別されるcardがchargeモデルの重要なパラメーターです。charge.capture()の行でネットワークコールが実行されます。
chargeが成功すると、次のようにStripeダッシュボードのTotal Volumeに金額が反映されます。
最後に
Stripeは優れたオンライン支払いプラットホームの1つです。Stripeのユニークなダッシュボードを使うとバックエンドコードを1行も書くことなくeコマースアプリが作成でき、商品を販売できます。
(原文:Integrating Stripe into Your Android App)
[翻訳:内藤夏樹/編集:Livit]
本記事はアフィリエイトプログラムによる収益を得ている場合があります